Introduction
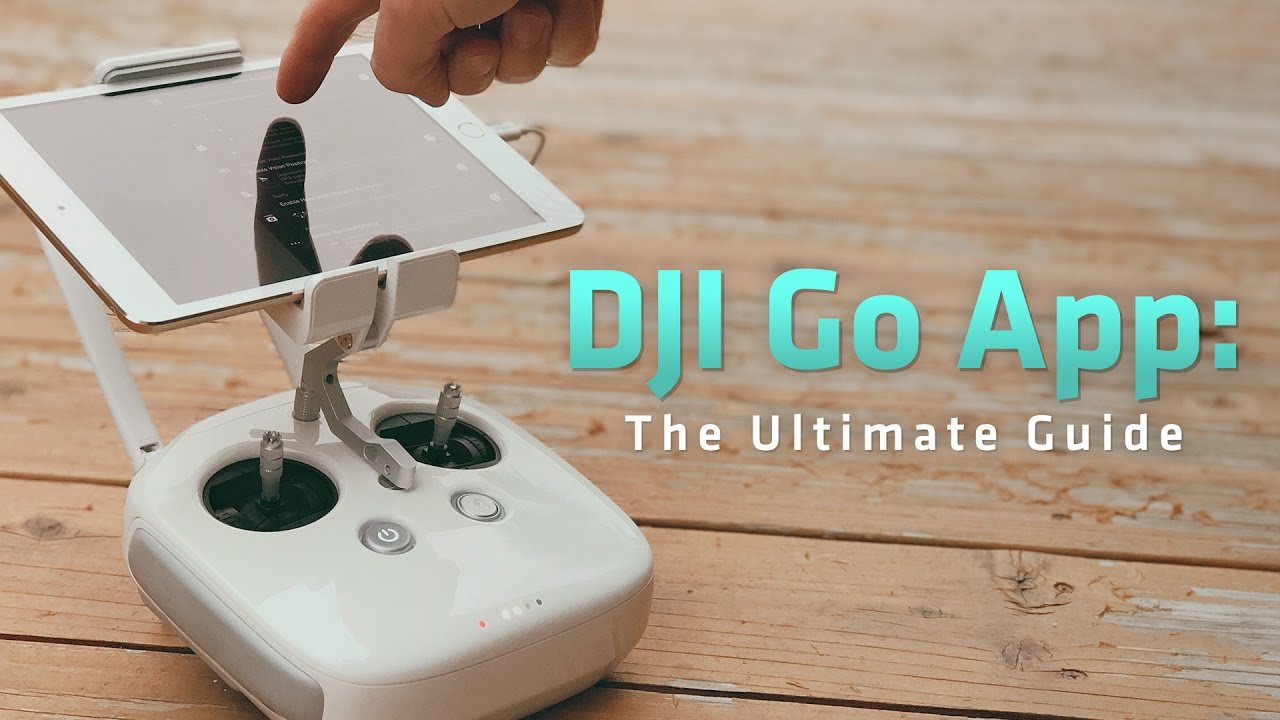
Overview of DJI Go App
If you’re stepping into the thrilling world of drone flying with DJI products, the DJI Go app is your best friend. This powerful application is designed to work seamlessly with DJI drones, offering a comprehensive range of features that enhance your flying experience and ensure safety. Imagine having flight controls, camera settings, and even a live video feed right at your fingertips, all through your Android device! The DJI Go app not only simplifies the operation of your drone but also elevates your aerial photography and videography game. From accessing flight logs to customizing your settings, it lays the groundwork for a successful flight every time. The interface is user-friendly, ensuring that whether you’re a novice or an experienced pilot, you can navigate easily through the varied functionalities it offers. In addition, the app comes with intelligent flight modes designed to take your creativity and capturing capabilities to new heights. These include features like Follow Me, Waypoints, and ActiveTrack, meaning it’s easier than ever to capture stunning footage. No more tedious hours spent planning your shot—just point, fly, and shoot!
Benefits of Mastering DJI Go on Android
Mastering the DJI Go app on your Android device will not only make you a more confident pilot but will also open up a world of creative possibilities. Here are some benefits you can look forward to:
- Enhanced Creativity: With features dedicated to film-making, you can explore various shooting modes to achieve dynamic shots. Whether you want to create breathtaking cinematic views or document a special event, mastering the app gives you unparalleled control over your results.
- Flight Safety: The app provides real-time data about your drone’s performance, battery status, and GPS signal. Understanding these metrics ensures that you can fly safely and avoid common pitfalls like flyaways or loss of control.
- User-Friendly Interface: The more you use the DJI Go app, the easier it becomes to navigate its features and settings. Regular use builds familiarity, allowing you to respond more effectively to any challenges you might encounter mid-flight.
- Quick Sharing Options: Captured footage can be edited on the app and shared instantly on social media platforms. It makes showcasing your skills effortless and fun, allowing friends and family to experience your adventures in real-time.
- Comprehensive Tutorials: The app includes instructional videos, tips, and guides that can help you develop your skills over time. Diving deeper into these tutorials can not only enhance your piloting techniques but can also keep you updated on the latest features available with every app update.
In conclusion, investing time to master the DJI Go app on your Android device will undoubtedly enrich your drone flying journey. With the ability to manage your drone effectively and creatively, you’re setting yourself up for unforgettable aerial experiences.

Getting Started with DJI Go
Downloading and Installing the App
Now that you’re excited about all the possibilities the DJI Go app offers, let’s get you set up! The first step is to download and install the app on your Android device. It’s a straightforward process, and I can assure you that with just a few taps, you’ll be soaring through the skies in no time!
- Open the Google Play Store: On your Android device, locate and tap the Google Play Store icon.
- Search for DJI Go: Type “DJI Go” in the search bar. You’ll find two versions: the standard DJI Go and the DJI Go 4 app. Depending on your drone model, you might need one version over the other. Make sure you download the correct app!
- Install the App: Tap on the “Install” button. The download should start immediately, and within a few moments, you’ll see the app icon on your home screen.
- Open the App: Once the installation is complete, tap “Open” to launch it and get ready to take your flying game to new heights!
It’s advisable to keep the app updated, as DJI frequently releases new features and fixes that improve functionality. So, turn on those auto-updates or check for updates regularly!
Creating a DJI Account
Before you start using all the great features, you’ll need to create a DJI account. This might seem like an extra step, but trust me, it’s worth it! Having an account not only allows you to access your flight records and purchase history but also keeps your app personalized and your drone safe. Here’s how to create your DJI account:
- Open the App: With the DJI Go app launched, look for the option to log in or create a new account.
- Select “Sign Up”: Tap the “Sign Up” button. You’ll be prompted to provide some basic information, including your email address and a password.
- Verification: After entering your details, you’ll receive a verification email. Go to your inbox, find the email from DJI, and click the verification link to confirm your account.
- Log In: Once verified, return to the app, log in using your new credentials, and voilà—you’re all set!
By creating a DJI account, you also gain access to additional features like cloud storage for your flight data, a community of fellow drone enthusiasts, and helpful support from DJI. Plus, it keeps everything secure and organized under one roof, making it easier to manage your devices. Getting started with the DJI Go app is as exciting as it is easy. With the app downloaded and your account set up, you’re well on your way to mastery. This foundation is essential for ensuring you have a smooth flying experience, and soon you’ll feel like a pro at capturing breathtaking aerial footage. So, let’s dive deeper into understanding the interface and customizing settings next!
Understanding the Interface
Navigation Basics
With your DJI Go app successfully downloaded and your account created, it’s time to familiarize yourself with its interface. Navigating through the app may initially seem overwhelming, but with a bit of guidance, you’ll quickly find it intuitive and user-friendly. Upon launching the app, you’re greeted with a sleek, organized home screen. Here’s how to navigate through it:
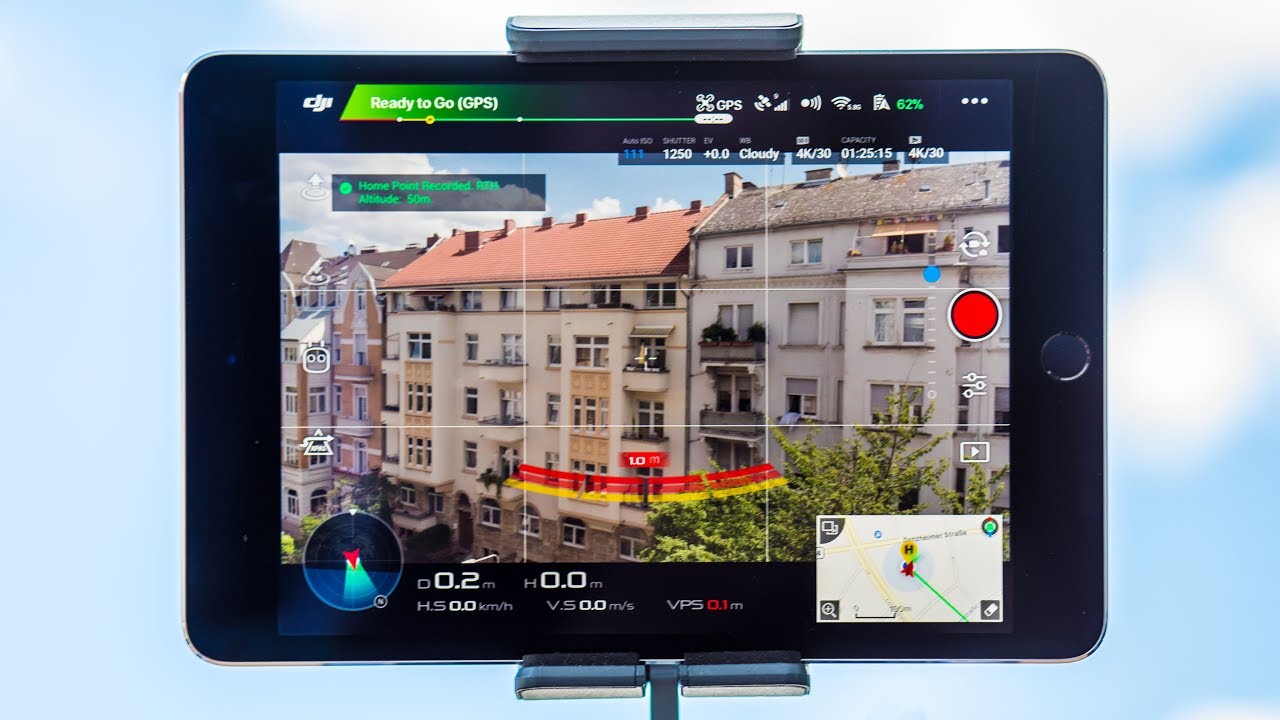
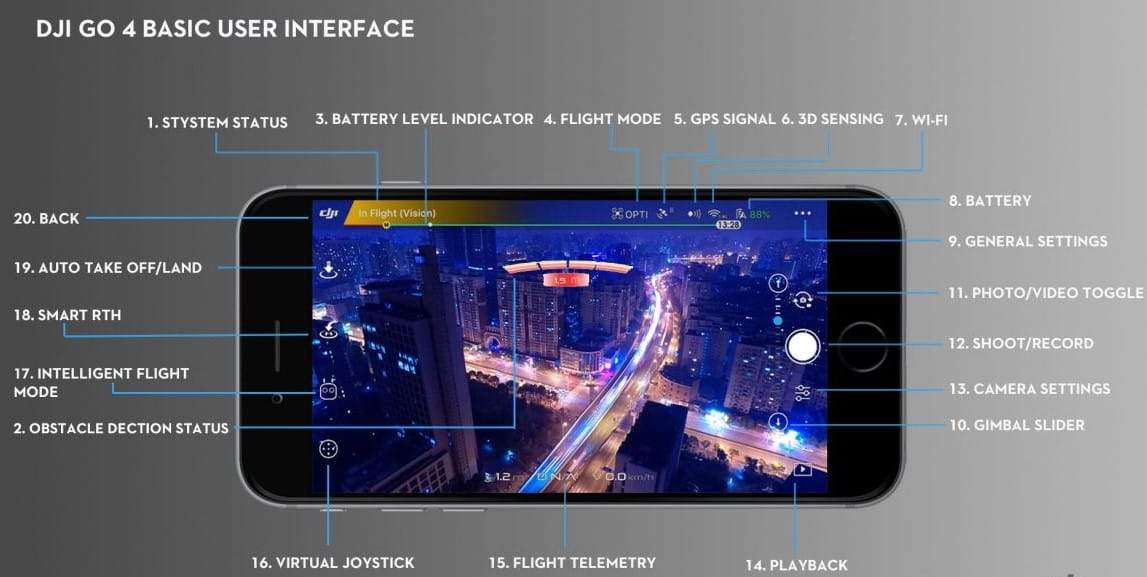
- Main Flight Screen: This is your command center! Here, you’ll find essential information like battery life, GPS signal strength, and your drone’s current altitude. Pay attention to these metrics as they’re crucial for a safe and successful flight.
- Camera Feed: Just below the main flight info, you’ll see a live feed from your drone’s camera. This is where you can frame your shots in real time. Don’t be shy about playing around! Fly around an open area and see how the feed looks to better understand your camera angles.
- Control Buttons: At the edges of the screen, you’ll find various buttons for functions like taking a photo, starting video recording, and accessing intelligent flight modes. Familiarize yourself with these icons, as they serve as virtual controls while flying.
- Map Display: The map section is incredibly handy for navigation and monitoring your drone’s position. You can zoom in and out, toggle between satellite and map views, and see where your drone is in relation to your launch point.
As you explore these sections, practice swiping and tapping to get the feel of how each button responds. You’ll find that the more you experiment, the more comfortable you become with the interface!
Customizing Settings
Once you’ve grasped the navigation basics, it’s time to personalize your experience by customizing the app’s settings. Tailoring these parameters can greatly enhance your flying experience and help you achieve optimal results. Here are some key settings you might want to adjust:
- Camera Settings: Access the camera settings to tweak parameters like ISO, shutter speed, and resolution. Adjusting these based on your shooting environment can dramatically improve your imagery. For instance, in bright daylight, I often decrease the ISO to maintain clarity and reduce noise in my shots.
- Flight Parameters: Customize your flight modes and control sensitivity. If you’re a beginner, consider setting the control sensitivity to low for smoother maneuvers. Once you’re more comfortable, you can amp it up for those sharp turns and snappy moves!
- Safety Features: Take some time to configure safety settings, such as max altitude and distance. Remember, it’s always better to err on the side of caution, especially if you’re still getting used to your drone. Setting these limits can give you peace of mind.
- User Interface Preferences: You can also change the layout of on-screen information and select the measurement units you’re most comfortable with. If you prefer metric or imperial, the app has got you covered!
Spending some time customizing the DJI Go app will make your flying experience more enjoyable and efficient. Remember, the better you understand the interface, the more control you’ll have to capture stunning aerial shots. Now that you’re all set, let’s connect your drone and get ready for an exhilarating flight!
Connecting to Your DJI Drone
Pairing Your Device
With the app’s interface now familiar to you, it’s time to connect your Android device to your DJI drone. This pairing process is straightforward, but follow these steps to ensure a smooth connection:
- Prepare Your Drone: Before you do anything, make sure your drone is powered on and in a safe, open area. Check that the battery is charged; there’s nothing worse than launching a drone only to have it land unexpectedly!
- Open the DJI Go App: Launch the app on your Android device. Your screen should display the main flight interface, ready and waiting for you to connect.
- Select Your Drone Model: The app will prompt you to select your model, so hit “Connect.” This step is crucial as it confirms which drone you’re attempting to pair.
- Connect via Wi-Fi or USB: Most DJI drones can connect via Wi-Fi or USB. For Wi-Fi, go to your Android’s Wi-Fi settings and connect to your drone’s network. For the USB connection, plug your drone’s cable into the device and choose ‘Go Fly’ on the app.
- Successful Connection: Once connected, you’ll see a confirmation message on your app indicating the drone is ready for flight! You’re all set to check out the impressive aerial views.
In my first experience, I remember the thrill of seeing my drone’s camera view pop up on my screen—it felt like magic! Just ensure you’re in an open space and away from crowded areas to safely initiate your flight.
Troubleshooting Connection Issues
Though the pairing process is usually seamless, issues can sometimes arise. Don’t worry—you’re not alone! Here are some common troubles and solutions to get you back in the air:
- Weak Wi-Fi Signal: If your device has trouble connecting, check your device’s Wi-Fi settings. Sometimes, moving closer to the drone can improve connectivity. If you’re using a USB connection, ensure the cable is securely connected.
- Firmware Updates: An outdated firmware version can hinder your connection. Always make sure both the drone and app are updated to the latest versions. Regular updates enhance performance and fix bugs!
- App Crashes: If the app crashes unexpectedly during pairing, try restarting your Android device and relaunching the app. Closing other applications can also help as it frees up memory.
- Device Compatibility: Occasionally, certain Android devices may face compatibility issues with specific apps. Always check DJI’s website for a list of supported devices, and contact DJI support if you’re still having issues.
- Drone Restart: Sometimes, simply restarting the drone can solve connectivity problems. Turn it off, wait a few seconds, and turn it back on.
Being prepared for potential hiccups can keep your flying experience enjoyable and stress-free. With these tips in mind, you’ll be ready to troubleshoot any connection issues and dive headfirst into the excitement of flying your DJI drone. Next up, let’s cover what you need to do before taking to the skies with a pre-flight checklist!

Pre-Flight Checklist
Configuring Camera Settings
Before taking off, it’s essential to ensure that the camera settings are dialed in to capture those stunning aerial views. Think of the pre-flight checklist as your personal guide to achieving the best footage possible. Here’s how you can set yourself up for success:
- Resolution and Frame Rate: Start by selecting the appropriate resolution for your shoot. For most scenarios, I opt for 4K resolution; it gives me crystal-clear footage. However, if you’re recording for social media or need more manageable file sizes, 1080p can work just fine. Also, consider the frame rate—30 fps is standard for smooth footage, but if you anticipate a lot of action, bumping it up to 60 fps can make fast-paced scenes look epic!
- ISO Settings: The ISO determines how sensitive your camera is to light. On bright, sunny days, I usually keep my ISO low (around 100-200) to maintain image quality. If it’s a cloudy day or you’re shooting in low light, increase the ISO cautiously to avoid grainy footage.
- Shutter Speed: The rule of thumb is to set your shutter speed at double your frame rate. So, if you’re filming at 30 fps, aim for a shutter speed of 1/60. This helps ensure that the images appear smooth and natural.
- White Balance: Set the white balance according to the lighting conditions. Use “Daylight” for sunny conditions and “Cloudy” when overcast. If you’re unsure, manually adjusting this setting can yield better results than letting the camera auto-adjust.
- Gimbal Settings: If your drone has a gimbal, ensure it’s calibrated. A properly balanced gimbal will render smooth footage and help prevent shakes or jitters.
With these settings fine-tuned, I’ve often noticed how much easier it is to achieve that stunning, professional look in my recorded videos!
Checking Weather Conditions
Now that your camera settings are set, it’s crucial to check the weather. Trust me; you don’t want to be caught in unfavorable conditions mid-flight!
- Wind Speed: Look for wind conditions. Ideally, you want winds of 10 mph or less for a stable flight. Strong winds can knock your drone off course or even lead to crashes. On one flight, I was caught in unexpected gusts, and it honestly made my palms sweat!
- Precipitation: Avoid flying in rain or snowy conditions. Not only does it affect visibility, but moisture can damage your drone’s electronics. Ensure you have a rain-free forecast for a top-notch flying experience!
- Temperature: Pay attention to the temperature. Lithium polymer batteries, which power most drones, tend to perform poorly in extreme heat or cold. Ideally, avoid flying in temperatures below 32°F (0°C) or above 104°F (40°C) to maximize battery life.
- Visibility: Always check visibility conditions. If it’s too foggy or cloudy, it’s best to postpone your flight. Clear skies not only make flying easier but also help you capture vibrant footage.
- Legal Restrictions: Lastly, always check for any local airspace restrictions or flight bans in the area. Certain places have regulations in place to ensure safety—and with the drone community growing, it’s essential to stay informed!
With the camera settings configured and the weather on your side, you’re all set for a fantastic flying adventure. Next, we’ll dive into mastering flight controls to help you navigate the skies like a pro!
Mastering Flight Controls
Basic Maneuvers
Now that you’ve checked your pre-flight checklist and are all set up, it’s time to dive into the exciting part: mastering flight controls! Understanding basic maneuvers is crucial as it lays the foundation for confident flying—so let’s break it down step by step.
- Takeoff and Landing: These are the most fundamental moves. To take off, gently push the throttle stick up while keeping an eye on your drone’s altitude. Practice gradual movements; it’s easy to ascend too quickly! For landing, slowly decrease the throttle and start bringing your drone down to a gentle descent. Engaging the “Return to Home” feature can be a lifesaver if you’re feeling nervous—this will automatically guide your drone back to its launch point.
- Yaw, Pitch, and Roll: Understanding these terms is key to maneuvering your drone in the air.
- Yaw: This refers to the rotation of the drone along its vertical axis. To practice yaw movements, simply rotate your drone left and right using the left joystick and observe how it spins while maintaining its altitude.
- Pitch: This is the forward or backward tilt of the drone. Using the right joystick, tilt forward to fly ahead or tilt backward to reverse.
- Roll: This refers to the side-to-side tilt. Practice rolling left and right to help you navigate around obstacles smoothly.
- Hovering: One of the most important skills is mastering how to hold your drone in a steady hover. This can be tricky, especially in the wind. Take the time to practice the subtle adjustments necessary to keep your drone stable in one spot.
As you practice these maneuvers, remember to enjoy the view! The feeling of controlling your own drone high in the sky is exhilarating. I still remember my first long hover; it felt like I was defying gravity!
Advanced Flying Techniques
Once you’ve gained proficiency in basic maneuvers, it’s time to step things up with some advanced flying techniques that will take your skills to new heights:
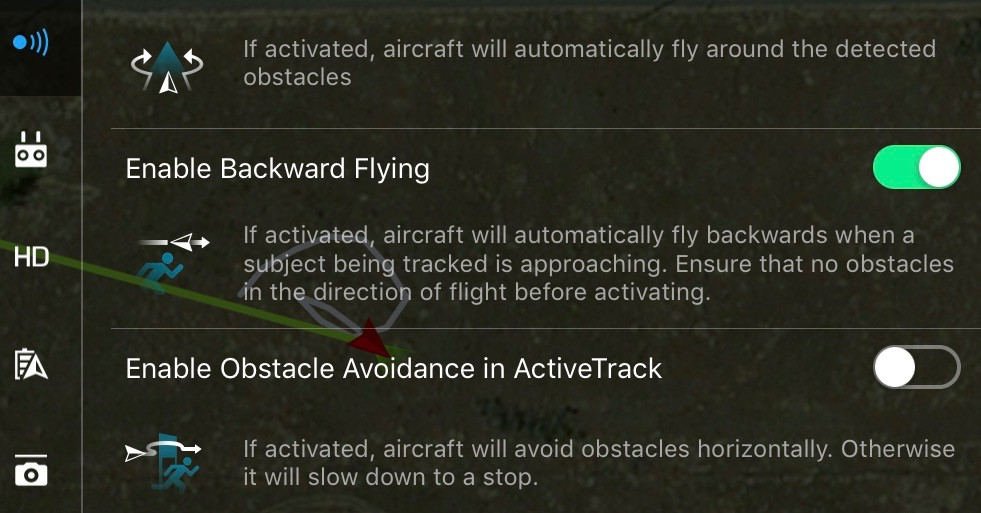
- Flight Modes: Most DJI drones come with intelligent flight modes like ActiveTrack or Waypoints. Experiment with these modes to make capturing dynamic shots easier. For instance, using ActiveTrack, you can have the drone follow you while you cycle or hike, allowing you to focus on the journey.
- FPV (First Person View): Flying in FPV mode can give you a whole new perspective—literally! Just remember to practice in open areas to avoid obstacles. Playing around with this mode has often led me to discover unique perspectives for filming.
- Cinewhoop Flying: This technique allows you to create smooth, cinematic footage by flying your drone in slower speeds with gentle movements. It’s all about fluidity and subtlety. Try this by combining slow yaw, pitch, and roll movements while maintaining a constant altitude—practice makes perfect here!
- Emergency Maneuvers: Knowing how to respond in a panic situation is crucial. Practice emergency stops and evasive maneuvers to ensure you can quickly react to any unexpected circumstances, like a sudden gust of wind or a curious bird.
- Practicing Location Awareness: You should always be aware of your surroundings as you fly. This skill comes with time and experience; the more you fly, the sharper your instincts will become for navigating around obstacles and other flyers.
Taking the time to master both basic and advanced maneuvers will significantly enhance your flying skills. With practice, you’ll not only feel confident controlling your drone but also creatively capturing breathtaking footage from the sky. Up next, we’ll dive into capturing stunning footage that will elevate your aerial photography and videography skills!
Capturing Stunning Footage
Using Intelligent Flight Modes
Now that you have a solid grasp of flight controls, it’s time to turn your attention to capturing stunning footage! One of the most effective ways to elevate your aerial photography and videography is by utilizing the intelligent flight modes that come with your DJI drone. These modes not only simplify your shooting process but also enhance the creativity of your shots.
- ActiveTrack: This mode is a game-changer; it allows your drone to automatically follow a subject, making it perfect for capturing dynamic shots as you or a friend move. I recently used ActiveTrack while biking through a scenic park. The drone effortlessly followed me, keeping me in frame while I focused on enjoying the ride!
- Waypoints: With Waypoints, you can set specific points for your drone to fly to. This is particularly useful for creating smooth, predefined flight paths for cinematic shots. First, plan out your location, then fly to each point while marking them in the app. Once everything is set, your drone will autonomously fly along the path you’ve programmed, leaving you free to focus on adjusting the camera angles and settings.
- Point of Interest: This mode enables your drone to circle around a specific subject while maintaining a steady distance. It’s perfect for capturing landmarks or a beautiful landscape. Just select the subject in the app, and the drone does the rest. If you want a dramatic video of your favorite monument, this is a tool you won’t want to skip!
- Terrain Follow: This feature allows your drone to automatically adjust its altitude based on the terrain below. It can be incredibly beneficial when flying over hills or uneven landscapes, ensuring that your footage remains at a consistent height above the ground.
By incorporating these intelligent flight modes into your shooting arsenal, you can create engaging and visually appealing content with much less hassle. You’d be amazed at the cinematic beauty you can achieve effortlessly!
Optimizing Camera Angles
With those intelligent flight modes in your toolkit, it’s time to talk about camera angles. The right angles can transform an ordinary shot into something extraordinary. Here are some tips to help you optimize your camera angles:
- Experiment with Height: Don’t be afraid to play with elevation. High-angle shots provide a broad overview of the landscape, while low-angle shots can give your footage a dramatic effect. The contrast can add layers to your storytelling, whether you’re capturing vast fields or towering forests.
- Utilize Dynamic Movements: Combining movements—like a smooth rise while tilting the camera down—can create a breathtaking reveal effect. This technique works wonders when transitioning from a wide shot of a beautiful vista to a close-up of a unique feature.
- Rule of Thirds: Keep in mind the rule of thirds when framing your shots. By placing important elements along the grid lines, you create a balanced composition that’s visually appealing. This simple trick can elevate even the most straightforward shots.
- Incorporate Leading Lines: Look for natural lines in the landscape that lead the viewer’s eye towards your subject. Roads, rivers, and paths can guide viewers through your footage, adding depth and interest.
- Stay Steady: A stable shot is crucial for professional-looking footage. Use gimbal settings to reduce unwanted shakiness and enable a smooth transition from one angle to another.
By combining intelligent flight modes with effective camera angles, you’ll be well on your way to capturing breathtaking aerial footage. Remember to experiment and have fun with it! The skies are the limit when it comes to creativity. Up next, we’ll look into editing and sharing your content to showcase your aerial adventures!
Editing and Sharing Your Content
Basic Editing Tools
Now that you’ve captured stunning aerial footage, it’s time to bring your creativity to life through editing! Editing is where you can really enhance your videos, shaping them into compelling stories. Fortunately, you don’t need to be a pro to get some fantastic results—the DJI Go app and various user-friendly editing tools have got you covered!
- Trimming and Cutting: Start by trimming unnecessary parts of your footage. Use the trimming tool to keep only the best clips. You’d be surprised how a little trimming can tighten up the pacing of your video! I often find myself with many shots that don’t quite sync with the vibe of the final product, so getting those out of the way helps.
- Stabilization: Even with gimbals and intelligent flight modes, videos can still have some shake. Use stabilization settings available in the editing tool to smooth out these minor jitters. This tool is especially handy if you’ve flown in windy conditions.
- Filters and Color Correction: Adjusting brightness, contrast, and saturation can breathe new life into your footage. Adding filters can also enhance the mood; for instance, a warm filter can evoke sunny summer vibes. I love using a subtle color correction to make the greens of a forest pop and the blues of the sky more vibrant.
- Text and Titles: Use text overlays to provide context or capture your audience’s attention. Titles can introduce different segments within your video, giving your viewers a smooth flow between themes. I often like to add a fun, engaging title at the start to set the tone for what’s coming.
- Music and Sound Effects: Don’t forget the power of sound! Adding background music can elevate your footage and create an emotional response. Many editing tools come with a library of royalty-free music, but you can always find other suitable tracks online. Just ensure you have the rights to any music you wish to use!
By using these basic editing tools, you’ll transform your raw footage into captivating content that tells a story—one that viewers will want to watch again and again.
Sharing on Social Media
With your masterpiece ready, it’s time to share it with the world! Social media is a fantastic platform for showcasing your work and connecting with fellow drone enthusiasts. Here are some tips to maximize your online presence:
- Choose the Right Platforms: Instagram, YouTube, and Facebook are popular choices for aerial footage. Each platform has its unique audience and video formats, so tailor your content accordingly. For instance, short, punchy clips are perfect for Instagram, while longer, narrative-driven videos can shine on YouTube.
- Use Hashtags Wisely: Incorporating relevant hashtags increases your content’s discoverability. Use hashtags like #dronephotography, #aerialfootage, or #DJI to connect with like-minded individuals. I’ve found that using a mix of popular and niche hashtags works wonders for getting noticed!
- Engage with Your Audience: Respond to comments, ask for feedback, and encourage viewer interaction. Building a community around your content can lead to more followers and opportunities for collaboration. I often find that people appreciate the connection, and it enhances the viewing experience for everyone.
- Share Behind-the-Scenes Content: Don’t be shy! Consider posting behind-the-scenes shots or stories about your drone adventures. This personal touch can create deeper connections with your audience and showcase the effort that goes into your work.
- Consistency is Key: Try to post regularly to keep your audience engaged. Whether it’s weekly videos or daily photos, consistent posting fosters a steady relationship with your viewers.
With your edits polished and your sharing strategy in place, you’ll not only captivate your audience but also inspire fellow creators on their aerial journeys. Up next, we’ll tackle some common troubleshooting issues to keep your flying experience as smooth as possible!
Troubleshooting Common Issues
GPS Signal Loss
Even the best drone pilots encounter challenges from time to time, and one common issue is GPS signal loss. This can happen for a variety of reasons, but knowing what to look for can help you troubleshoot effectively.
- Check Your Location: The first step is to ensure that you’re in an open area free from obstructions. Tall buildings, dense forests, and even heavy cloud cover can interfere with GPS signals. On one occasion, I was filming near a mountainous area, and my drone unexpectedly lost signal! I quickly learned that flying in more open spaces leads to a much more reliable GPS connection.
- Pre-Flight Checks: Always check your drone’s GPS status before launching. The DJI Go app will typically indicate whether your GPS is ready to go. Takeoff should only occur when the app shows a strong signal (ideally, at least 7-10 satellites). If you’re not receiving a signal, stay grounded and adjust your position.
- Wait for Initialization: When powering up the drone, give it some time to establish a stable GPS connection. It can take a few minutes, especially if there was a previous loss of signal. Patience is key; I often tell myself to take a deep breath and admire my surroundings while waiting!
- Firmware Updates: Sometimes, GPS issues can stem from outdated firmware. Always ensure that both your drone and the DJI Go app have the latest updates installed. Regular updates not only improve functionality but can also resolve connectivity issues.
- Avoiding Interference: Electrical interference from nearby power lines or large metal structures can disrupt GPS signals. If you suspect interference, try moving to another location to see if that resolves the issue.
Being proactive about these considerations will keep your flights smooth and worry-free.
App Crashing Problems
Another common headache that drone enthusiasts face is app crashes. Nothing is more frustrating than being in the zone and suddenly losing your connection to the drone! Here are some steps to troubleshoot and minimize this issue:
- Restart the App: When the app crashes, a simple restart can work wonders. Close the DJI Go app completely and reopen it. This usually resolves any temporary glitches.
- Device Compatibility: Be sure to check that your Android device is compatible with the latest version of the DJI Go app. Some older devices may struggle to run the app smoothly, leading to crashes. It’s wise to consult the DJI website for the latest compatibility list if you’re unsure.
- Clear Cache: Over time, accumulated data can lead to performance issues. Go into your device settings, find the DJI Go app, and clear its cache. This quick step can enhance the app’s performance and prevent crashes.
- Free Up Memory: Before going out for a flight, close any unnecessary apps running in the background. Doing this will free up memory on your device and provide the app with the resources it needs to function properly.
- Update Your Device’s Software: Keeping your Android device’s operating system updated ensures better compatibility with the DJI Go app. Regular software updates include bug fixes that can improve performance and stability.
- Uninstall and Reinstall: If all else fails, you might want to consider uninstalling the app and reinstalling it. This fresh start can help resolve persistent issues and restore functionality.
By troubleshooting these common problems, you’ll be able to spend more time enjoying your flights and less time worrying about connectivity. Remember, every pilot faces these challenges, and learning to navigate them is all part of the journey. Now that you have a clearer path for troubleshooting, let’s wrap up with a summary of what you’ve learned on this exciting adventure!