Introduction to DJI Go 4
If you’ve just invested in a DJI drone, congratulations! You’re stepping into a world of aerial photography and videography that opens up fantastic creative avenues. One of the most crucial tools at your disposal is the DJI Go 4 app. This handy app allows you to manage your drone’s features efficiently. Understanding its functionalities will give you the control you need to enhance your flying experience and get the most out of your drone. So let’s delve into the features it offers, and then I’ll guide you through downloading and setting it up.
Understanding DJI Go 4 Features
Before you jump into the setup, let’s take a moment to appreciate the incredible features that DJI Go 4 offers. Here are a few standout functionalities that you’ll likely find most useful:
- Live HD View: The app provides a real-time HD video feed directly from your drone’s camera. This feature is especially useful for framing your shots and ensuring you’re capturing exactly what you want as you fly.
- Comprehensive Camera Settings: Get full control over your camera settings, including ISO, shutter speed, and more, allowing you to maximize the quality of your photos and videos.
- Intelligent Flight Modes: DJI Go 4 offers various intelligent flight modes like Follow Me, Waypoints, and Circle. These modes make it easy to capture complex shots without requiring advanced piloting skills.
- Editing Tools: You can edit your videos directly within the app. Trim clips, add music, and apply filters before sharing your stunning aerial footage online.
- Flight Data Tracking: The app keeps track of your flight statistics, including distance covered, flight speed, battery life, and usage history, helping you analyze and improve your flying skills.
- Sharing and Connectivity: With just a few taps, you can share your captured memories on social media platforms, making it easy to showcase your aerial adventures.
Isn’t that cool? But these features are only as good as your ability to set them up properly. That’s where downloading and setting up the DJI Go 4 app comes into play.
Downloading and Setting Up DJI Go 4
Ready to get started? Downloading and setting up DJI Go 4 is straightforward, making it friendly for even the most tech-averse user. Here’s a step-by-step guide to help you along the way:
- Get the Right Device: First, ensure your smartphone or tablet is compatible. DJI Go 4 is available on both iOS and Android, so check your app store.
- Download the App:
- For iOS Users: Open the App Store, type “DJI GO 4” in the search bar, and hit download.
- For Android Users: Open the Google Play Store, type “DJI GO 4” into the search field, and download the app.
- Open the App: Once it’s installed, find the DJI Go 4 icon on your device and tap to open it.
- Create a DJI Account (if you haven’t already): You’ll be prompted to log in or create a DJI account. I recommend registering, as it allows you to access user support, firmware updates, and cloud storage options.
- Connect Your Device to Your Drone: Make sure your drone is powered on. Connect your smartphone or tablet to the drone’s controller with a USB cable. The app should automatically recognize your drone.
- Firmware Updates: It’s essential to keep everything running smoothly. The app will notify you if your drone or remote controller has available firmware updates. Be sure to follow the on-screen instructions to maintain optimal performance.
- Calibration: Upon the initial connection, you may need to calibrate your drone’s compass as a safety precaution. The app will guide you through the calibration process; just follow the instructions carefully.
- Initiate a First Flight: Once everything is set, you’re ready for takeoff! And remember, your first flight is all about getting comfortable. Find a quiet, open area to practice before venturing further afield.
Summary of Setup Process
Here’s a quick summary table for visual learners to help you navigate the downloading and setup process:
| Step | Action |
|---|---|
| 1. Device Compatibility | Confirm your device is supported |
| 2. Download App | App Store (iOS) or Google Play (Android) |
| 3. Create Account | Log in or create a DJI account |
| 4. Connect to Drone | Use USB to connect to the controller |
| 5. Firmware Updates | Check and update all components |
| 6. Calibration | Calibrate the compass using the app |
| 7. First Flight | Find a safe area and practice! |
With the app installed and your drone set up, you’re ready to explore the sky like never before. Remember to familiarize yourself with the features we discussed earlier for the best experience. Just think of the stunning shots and adventures that await! 🎉 In the next section, you’ll dive into a deeper understanding of the DJI Go 4 interface. You’ll get a closer look at the layout and learn how to customize settings to fit your flying style perfectly. Let’s get to it!

Getting Familiar with the Interface
Now that you’ve successfully downloaded and set up the DJI Go 4 app, let’s take a closer look at its user interface. Getting familiar with the layout will help you navigate the app like a pro and harness its features to their fullest potential. Trust me, knowing where everything is can make your flying experience smoother and more enjoyable!
Layout of DJI Go 4 Interface
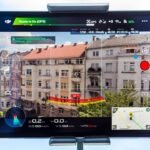
When you first open the DJI Go 4 app, you’ll notice a sleek design that puts the essential tools at your fingertips. Here’s a breakdown of the key components of the interface, so you know what to look for:
- Live View Screen: This is the primary screen where you’ll see what your drone sees in real time. The live video feed is typically displayed prominently in the center. You can access important information regarding your flight on this screen, but don’t let it distract you while piloting. Trust me, keeping your eyes on the drone is always a priority!
- Camera Controls: Located on the right side of your screen, this panel allows you to adjust camera settings in real-time. You can find options for:
- Shutter Speed
- ISO
- White Balance
- Exposure Compensation
- Flight Information Display: At the top of the screen, various flight data is displayed. This includes crucial details such as:
- Battery Level: Monitor your battery health and avoid unexpected landings.
- Altitude: Know how high you are flying.
- Distance: Keep track of how far you are from your take-off point.
- Status Indicators: On the upper corners, you’ll see indicators for GPS status, compass health, and Wi-Fi connection. These are essential for ensuring safe flights.
- Menu Bar: The bottom of the screen features a menu bar that provides quick access to different modes, settings, and features such as:
- Photo/Video Switch: Easily toggle between photo and video modes.
- Playback: Review your captured footage without leaving the app.
- Map and Navigation: On the left side of the interface, you’ll find the map view. This gives you a layout of your surroundings and is super helpful for navigation, especially if you’re flying in unfamiliar areas.
Understanding these core components will help you navigate the app confidently as you embark on your flying adventures. Don’t be afraid to explore the screen and become accustomed to the organization—it’s all about getting comfortable with your flying environment!
Customizing Settings in DJI Go 4
Now that you have a handle on the layout, let’s move on to customizing settings within the DJI Go 4 app. Personalizing your settings can drastically enhance your flying experience, making it a lot more tailored to your preferences. Here’s how you can make the app your own:
- Accessing Settings: You can access the settings menu by tapping the three-dot icon (☰) usually found in the upper right corner of the main interface. This will open a menu where various options can be adjusted.
- Camera Settings: Here’s where you can finetune your camera to get the best shots possible. You can adjust:
- Photo Format: Select between JPEG and RAW based on your editing needs. I find RAW offers more flexibility during post-processing.
- Video Resolution: Choose your preferred resolution, such as 1080p or 4K, depending on how you plan to use your footage.
- Gimbal Settings: Calibrating your gimbal can make a world of difference in your video quality.
- Gimbal Mode: You can customize how your camera moves in relation to your drone’s movement. Explore ”Follow” and ”FPV” modes to find what suits your videography style.
- Flight Settings: This is critical for safety and performance.
- Max Altitude and Distance: Set limits to avoid accidentally flying too high or too far away. I remember flying beyond my comfort zone and panicking when I lost sight of my drone. Setting boundaries helps keep your flying experience enjoyable and safe.
- Return-to-Home (RTH) Settings: Customize the altitude your drone will fly to when returning home. I usually set it high enough to clear any obstacles.
- Control Customization: If you have a preference for how your controller handles, you can modify stick sensitivity. Adjusting these allows for finer controls, making it easier to maneuver your drone smoothly.
- Smart Features: Explore advanced settings for intelligent flight modes based on your needs.
- Follow Me: Whether you’re biking down a trail or kayaking on a lake, this mode can automatically keep the camera trained on you.
- Waypoints: Pre-plan your flight path to capture stunning footage of your favorite spots without constant piloting.
- User Interface Customization: Don’t forget to tweak UI elements based on your preference. You can choose between dark or light themes and prioritize the information that’s crucial for your flights.
- Control Calibration: Before each flight to ensure precision, periodically calibrate your controller and compass. This will help safeguard your mission and ensure accurate navigation.
Here’s a handy checklist for customizing your settings:
| Customization Area | Options |
|---|---|
| Camera Format | Switch between JPEG and RAW |
| Video Resolution | Choose 1080p, 2.7K or 4K |
| Gimbal Mode | Select Follow or FPV |
| Max Altitude | Set a safe altitude boundary |
| Return-to-Home Settings | Customize RTH altitude |
| Stick Sensitivity | Adjust for more precise control |
| Smart Features | Activate Follow Me/Waypoints |
| User Interface | Choose dark/light themes |
By customizing your DJI Go 4 app, you’ll create a flying environment that’s user-friendly and tailored precisely to your needs! As you become more acquainted with the app and its settings, you’ll find yourself gaining confidence and enhancing your skills with each flight. In our next section, we will dive into camera settings and controls. You’ll learn how to capture beautiful images and videos, ensuring your memories are as vibrant as the experiences themselves. Let’s keep soaring! 🚀

Camera Settings and Controls
Having familiarized yourself with the DJI Go 4 interface and customized your settings to fit your flying style, it’s now time to delve deeper into one of the most exciting aspects of drone flying: the camera settings and controls! Whether you’re capturing breathtaking landscapes or exciting action shots, understanding your camera settings is crucial for ensuring your images and videos come out just as you envision them.
Adjusting Camera Settings
The camera settings in DJI Go 4 allow you to manipulate various aspects of your footage. Getting acquainted with these settings will enhance your photography and videography skills drastically. Here’s how to navigate the main camera settings:
- Resolution and Frame Rate:
- Resolution: The higher the resolution, the more detail your footage will capture. You might want to shoot in:
- 1080p for standard quality.
- 2.7K if you need better detail but also want to save space.
- 4K for the highest quality—perfect for professional-looking content.
- Frame Rate: This determines how smooth your video looks and how you can achieve slow motion. Common options include:
- 30 fps for regular footage.
- 60 fps for smoother videos.
- 120 fps or above for slow-motion effects, which you can later slow down in editing.
- Resolution: The higher the resolution, the more detail your footage will capture. You might want to shoot in:
- Shutter Speed:
- Shutter speed has a dramatic impact on how motion is portrayed in your shots. A general rule for video is to use a shutter speed that’s double your frame rate. For example, if shooting at 30 fps, set your shutter speed to 1/60s. This balance captures motion more naturally, making your shots smoother.
- For photos, however, you might want a wider range based on conditions. If you’re capturing fast-moving subjects or low-light environments, adjust accordingly.
- ISO Settings:
- ISO affects how sensitive your camera is to light. Lower values (such as 100-200) are best for bright conditions, while higher values (800 and up) can work in low-light situations.
- Keeping the ISO low helps reduce noise in your images, which is crucial if you aim to maintain details in your shots.
- White Balance:
- This setting helps you control the color temperature of your footage. If you’re shooting outside on a sunny day, a white balance of around 5200K (Daylight) works well.
- Experiment with settings like Cloudy (6000K) or Shade (7000K) when shooting in varying weather conditions. I often find adjusting the white balance enhances the overall mood of my footage!
- Exposure Compensation:
- This setting enables you to adjust the exposure level based on your shooting materials. If your image appears too bright or too dark, use exposure compensation to tweak the levels to your liking.
- A good starting point is to set your compensation to 0 and adjust from there based on your spot-checks.
- Shooting Modes:
- Choose between different shooting modes depending on your subject matter:
- Single Shot: Just a regular snap of the scene.
- Burst Mode: Capture multiple images in quick succession—great for action shots.
- Interval Shooting: For time-lapse sequences, set the intervals and let the camera work its magic.
- Choose between different shooting modes depending on your subject matter:
Here’s a brief checklist for adjusting your camera settings:
| Setting | Recommended Values |
|---|---|
| Resolution | 1080p, 2.7K, or 4K |
| Frame Rate | 30 fps (standard), 60 fps (smooth), 120 fps (slow-motion) |
| Shutter Speed | Double your frame rate |
| ISO | 100-200 (bright), 800+ (low light) |
| White Balance | Adjust based on conditions (Daylight: 5200K) |
| Exposure Compensation | Start at 0, adjust as needed |
| Shooting Modes | Single Shot, Burst, Interval |
Mastering these camera settings can truly take your drone footage to the next level! Now, let’s explore how to navigate the camera controls effectively.
Understanding Camera Controls
The controls for manipulating your camera settings are user-friendly but can feel overwhelming initially. However, I assure you that with some practice, they will become second nature. Here’s a closer look at how to utilize these controls to your advantage:
- Using the Touchscreen:
- Most of your camera settings are adjustable directly from the live view screen. Tapping the relevant icons allows for quick adjustments—no need to scroll through lengthy menus. This feature allows you to spend more time capturing and less time fumbling around!
- Quick Access Buttons:
- Familiarize yourself with quick access buttons on the right side of the live view screen. You can adjust settings like ISO and shutter speed conveniently without diving deep into the menus.
- Experiment with different configurations to see which fits your shooting style best.
- Joystick Controls:
- The physical controls of your drone remote also impact the camera’s direction. Use the left joystick to tilt the gimbal up and down and the right joystick to pan left and right. Mastering these controls will allow for smooth panning and tilting, which is key for professional-quality videos.
- Customizable Shortcut Buttons:
- In the settings menu, consider customizing the controls on your remote. Assign frequently used settings to buttons, minimizing the time spent navigating during your flight. This option is invaluable when you’re mid-flight and need to make quick adjustments.
- Preview and Playback Controls:
- After capturing footage, review your shots on the app. Use the playback controls to assess the quality of your captures. This instant feedback loop can help you learn and adjust your techniques on the fly.
- Practice Makes Perfect:
- Just like flying your drone, mastering these camera controls comes with deliberate practice. Dedicate some flight time focusing solely on camera adjustments to become comfortable with the settings and responsive during flights.
Creating beautiful drone images and videos is all about efficiently using the camera settings and controls in DJI Go 4. It’s a learning journey, but as you experiment with different settings, you’ll discover what works best for your storytelling style. The next step in your drone journey will take us to the realm of flight settings and navigation. Are you ready to elevate your flying experience even further? Let’s take to the skies! ✈️

Flight Settings and Navigation
Having mastered the camera settings and controls, you’re now well-equipped to capture stunning images and videos. However, just as crucial as how you shoot is how you fly. Understanding the flight settings and navigation features of DJI Go 4 can significantly enhance your overall flying experience, allowing for safe and effective piloting. Let’s explore how to set up your flight parameters and navigate like a seasoned pilot.
Setting Up Flight Parameters
Before you ascend into the skies, it’s important to configure your flight settings properly. These parameters will not only ensure you have a smooth flight but also help maximize your drone’s performance based on your personal flying style. Here’s what you need to know:
- Max Altitude:
- Setting your drone’s maximum altitude prevents it from flying too high and losing signal or control. Depending on your flying experience, you might want to set a limit:
- Beginner: Start with a max altitude of 100 meters.
- Intermediate: Consider a limit around 120-150 meters.
- Advanced: If you’re comfortable and familiar with regulations, set it higher—up to the legal limits in your area.
- Setting your drone’s maximum altitude prevents it from flying too high and losing signal or control. Depending on your flying experience, you might want to set a limit:
- Max Distance:
- Similar to altitude, setting a max distance will help you stay within a safe flying range. A good starting point is 500-1000 meters. This range allows for plenty of exploration while ensuring you retain control and connection to your drone.
- Return-to-Home (RTH) Settings:
- The RTH feature is a lifesaver if your drone loses connection or runs low on battery.
- Here, you can set:
- RTH Altitude: Ensure this is above any obstacles in your flying area; around 30 meters is often ideal.
- Smart RTH: Activate this so that your drone will automatically find its way back to you using GPS.
- Aerial Survey Parameters:
- If you’re using your drone for mapping or aerial surveys, set parameters for flight planning. This includes:
- Overlap Settings: Determine how much images should overlap to ensure quality stitching in post-processing.
- Waypoints: You can plan specific waypoints to capture precise areas of interest.
- If you’re using your drone for mapping or aerial surveys, set parameters for flight planning. This includes:
- Flight Mode Settings:
- Familiarize yourself with available flight modes:
- GPS Mode: Provides stability and accurate positioning.
- ATTI Mode: Disables GPS stabilization; useful for advanced maneuvers and windy conditions, though it requires more piloting skill.
- Sport Mode: Gives maximum speed and responsiveness. This mode is thrilling but best reserved for experienced pilots!
- Familiarize yourself with available flight modes:
- Battery Management Alerts:
- Ensure your settings for battery management notifications are enabled. You’ll want prompts to alert you when the battery reaches a critical level, making sudden landings less likely.
Here’s a neat checklist to ensure your flight parameters are all set before take-off:
| Parameter | Recommendations |
|---|---|
| Max Altitude | 100m (beginner), 120-150m (intermediate), higher for advanced |
| Max Distance | 500-1000m |
| RTH Altitude | At least 30m |
| Aerial Survey Overlap | Set based on requirements |
| Flight Modes | Choose according to conditions |
| Battery Management Alerts | Always enable |
Setting your flight parameters properly will give you a solid foundation on which to build your skills and flying confidence. Now, let’s talk about how to navigate the skies using the DJI Go 4 app!
Navigating with DJI Go 4
Understanding navigation is essential for any drone operator. DJI Go 4 offers a variety of tools that ensure you know where your drone is, where it’s going, and how to return safely. Here’s how navigation works with this user-friendly app:
- Interactive Map View:
- The map section on the left side of the screen gives you a bird’s eye view of your surroundings.
- Familiarizing yourself with this map is essential, as it helps you spot landmarks and navigational cues.
- Keep an eye on your drone’s location (marked as a dot) and whether it’s within your selected parameters.
- Home Point Indicator:
- The app marks your home point (where you launched your drone). This indicator is crucial for orienting your return when flying far away.
- Use this information to gauge how far you are from your starting position—it’s a necessary safety check!
- Real-Time Tracking:
- The app displays real-time data about your drone’s current speed, altitude, and distance from home.
- Feel free to glance at this information, but always prioritize keeping your visual line of sight on the drone. This is vital for air safety.
- Waypoints Navigation:
- If you’ve set waypoints for your flight, you can easily navigate by selecting your planned route from the app. This feature allows for complex flight paths without needing to control the drone manually.
- Waypoint flying is a fantastic tool for obtaining consistent shots in a specific area, whether you’re mapping land or capturing scenic vistas.
- Automatic Flight Modes:
- For added navigation assistance, utilize intelligent flight modes like Follow Me or Point of Interest:
- Follow Me: Perfect for videos where you want the drone to automatically track your movement. Just activate it, and your drone will keep you in the frame.
- Point of Interest: This allows the drone to fly around a point you select, keeping that subject in focus. It’s great for creative shots of buildings or natural landmarks.
- For added navigation assistance, utilize intelligent flight modes like Follow Me or Point of Interest:
- Obstacle Avoidance Sensors:
- Most DJI drones come equipped with intelligent obstacle avoidance. It’s crucial to enable this feature if available. It helps your drone automatically navigate around obstacles, making your flight smoother and safer.
- Understanding No-Fly Zones:
- Always be aware of local regulations, especially where no-fly zones (such as airports) are concerned. The app will indicate these zones on the map, so plan accordingly to avoid hefty fines or worse.
- Practice Navigational Maneuvers:
- Perhaps take the opportunity during one of your flights to practice navigating effectively using the map and app controls. Start by flying around a large, open area, changing your elevation and direction, and familiarizing yourself with how to move with precision.
Here’s a quick reference to navigation tools within the DJI Go 4 app:
| Tool | Purpose |
|---|---|
| Interactive Map View | Bird’s eye view of surroundings |
| Home Point Indicator | Marks your launch point |
| Real-Time Tracking | Displays speed, altitude, and distance |
| Waypoints Navigation | Preplanned flight paths for efficient flying |
| Flight Modes | Automate tracking or circular flying |
| Obstacle Avoidance Sensors | Prevents crashes and collisions |
| No-Fly Zone Awareness | Alerts to restricted areas |
Navigating with confidence and safety is as crucial as capturing stunning imagery. It’s about finding that perfect balance between controlling your drone and making the most of the technology DJI Go 4 offers. As you progress in your flying, these navigation and flight settings will become second nature, making your experiences more enjoyable and worry-free. Next up, I’ll introduce you to some advanced features and modes in DJI Go 4 that can take your flying and filming to an entirely new level. Are you ready to explore the smart side of your drone? Let’s get into it! 🌟

Advanced Features and Modes
Now that you’ve set up your drone, navigated with confidence, and mastered camera settings, let’s take your flying experience up a notch with the advanced features and modes offered by the DJI Go 4 app! These intelligent flight modes can transform the way you capture aerial footage, making your shots look professional without needing extensive piloting skills. Get ready to explore some exciting features that will elevate your drone game!
Intelligent Flight Modes
DJI has equipped its drones with several intelligent flight modes designed to enhance your creative possibilities. These modes allow for complex maneuvers, automated filming techniques, and much more! Here’s a closer look at these handy features:
- Follow Me Mode:
- Follow Me is an excellent option for capturing those thrilling outdoor activities like biking, running, or surfing.
- How it works: Once activated, your drone will lock onto your smartphone’s GPS signal and follow you wherever you go. It keeps you in the frame, allowing for dynamic shots without needing to pilot the drone manually.
- Pro tip: Ensure your drone has a clear line of sight to maintain the connection and avoid any fly-aways!
- Waypoint Flying:
- If you want to cover a particular area with precision, Waypoints is your go-to mode.
- You can pre-set specific coordinates for your drone to fly to in a sequence. This is perfect for surveillance, mapping, or simply ensuring you capture a scenic route.
- Pro tip: Practice creating a simple waypoint route and executing it before attempting more complex paths for a smooth experience.
- Point of Interest (POI):
- Want to get the perfect shot of a landmark? POI is your friend!
- The drone will circle around a designated subject, maintaining its focus as it captures footage. This mode adds a cinematic quality without requiring much control finesse.
- Pro tip: Pick interesting subjects—like a monument, a car in motion, or a beautiful garden—to make your footage pop.
- Circle Mode:
- Similar to POI, Circle Mode lets your drone orbit a specific point while maintaining a set altitude.
- This feature is great for giving your audience a sense of the surroundings and adding depth to your videography. Plus, it keeps your subject centered without you needing to manage it actively!
- Pro tip: Experiment with different altitudes and orbit speeds for varied results.
- Terrain Follow:
- When flying over uneven terrain—think hills, valleys, or mountains—Terrain Follow ensures your drone maintains a consistent height above the ground.
- This mode is incredibly useful for capturing smooth footage while navigating through variable elevations.
- Pro tip: Before activating it, ensure the drone has good visibility of the terrain to get accurate readings!
- Custom Flight Modes:
- For advanced users, customizing flight modes is key. You can create your own flight paths and adjust specific settings such as speed, altitude, and more.
- This feature allows you to tailor the drone’s behavior to match your filming style and desired outcomes.
Here’s a quick reference table for the intelligent flight modes you can utilize:
| Flight Mode | Purpose | Ideal For |
|---|---|---|
| Follow Me | Automates tracking of the pilot | Outdoor adventures |
| Waypoints | Pre-planned flight paths | Surveillance and mapping |
| Point of Interest | Orbits around a specified subject | Capturing landmarks |
| Circle Mode | Circles around a target while maintaining altitude | Cinematic shots |
| Terrain Follow | Maintains altitude over varying terrain | Smooth flying in hilly areas |
| Custom Flight Modes | Tailor settings and paths | Unique filming strategies |
Using these intelligent flight modes not only enhances the creativity of your footage, but they also allow you to focus more on the content and less on piloting with precision. Now, let’s look into QuickShot and ActiveTrack features that provide even more opportunities for spectacular shots!
Using QuickShot and ActiveTrack in DJI Go 4
DJI has packed the DJI Go 4 app with features that enable quick and easy filming, like QuickShots and ActiveTrack. These functionalities will add pizzazz to your content with minimal effort, allowing you to accomplish amazing shots in no time.
- QuickShot Modes:
- QuickShot modes are pre-configured short maneuvers that let you capture stunning footage with just one tap.
- There are several options available:
- Dronie: The drone flies back while ascending, creating a dramatic reveal shot. Great for establishing breathtaking landscapes.
- Rocket: The drone ascends vertically while keeping the camera focused on a predefined subject, ideal for showcasing heights or tall structures.
- Circle: This is similar to the manual Circle Mode but automated. Your drone will circle around the subject, capturing the environment as it goes.
- Helix: The drone ascends while spiraling around your subject, producing a captivating, dynamic perspective.
- Boomerang: The drone flies away and then returns to its starting point in a looping path around the subject, which adds a fun twist to footage.
- Pro tip: QuickShot modes are perfect for social media posts! Experiment with different modes to see which best captures your subject matter.
- ActiveTrack:
- This feature takes Following Me to the next level. With ActiveTrack, you can designate a subject for the drone to follow while autonomously avoiding obstacles.
- Selecting a Subject: Tap your subject on the screen, and your drone will recognize it. It will then track that subject automatically, whether you’re walking, biking, or even rollerblading!
- Three Tracking Modes:
- Trace: The drone will follow behind and track your movement while you go along a path.
- Profile: This keeps the camera on the side of your subject, providing unique angles as you move.
- Spotlight: You can control the drone’s movements while it keeps the camera focused solely on the subject. This is great for dynamic footage while allowing full manual control.
- Pro tip: Use ActiveTrack in well-lit environments to ensure the drone can track effectively. Also, ensure there’s enough space available to prevent bumps with obstacles!
Here’s a handy table summarizing the QuickShot modes and ActiveTrack features:
| Feature | Description | Best Use Cases |
|---|---|---|
| QuickShots (Dronie) | Ascends backward to reveal scenery | Stunning landscape reveals |
| QuickShots (Rocket) | Ascends vertically while focusing | Showcasing tall objects |
| QuickShots (Circle) | Automatically circles around a subject | Capturing landmarks |
| QuickShots (Helix) | Ascends while spiraling around the subject | Dynamic footage |
| QuickShots (Boomerang) | Flies away then back in a loop | Fun, engaging shots |
| ActiveTrack (Trace) | Follows your movements from behind | Action shots during activities |
| ActiveTrack (Profile) | Keeps the camera on the side of the subject | Unique angles and perspectives |
| ActiveTrack (Spotlight) | Manually control drone while it focuses | Dynamic photography |
Utilizing QuickShots and ActiveTrack can simplify your filming process while ensuring you capture creativity in motion. You won’t need to be a professional videographer to get beautiful results—just set it up, activate the mode, and watch your drone work its magic! Balancing these advanced features with the basics has the potential to unlock a slew of opportunities for creative expression. With every flight, your skills will improve, leading to increasingly captivating footage. In our next discussion, we will wrap things up with key takeaways and recommendations for getting the most out of your drone experiences. You won’t want to miss it! Let’s keep soaring! 🚀✨