
Introduction
When it comes to aerial photography and videography, the DJI Mavic 2 Pro stands out as a favorite among drone enthusiasts and professionals alike. With its stunning camera quality and advanced features, it’s no wonder you want to keep this incredible piece of technology in peak condition. However, one of the most critical aspects of maintaining your Mavic 2 Pro isn’t just about flying it; it’s all about caring for its battery. A well-maintained battery not only ensures longer flight times but enhances the overall performance of your drone.
Importance of DJI Mavic 2 Pro Battery Care
Let’s face it—your drone’s battery is its lifeblood. Without a robust battery, you can’t achieve the breathtaking shots or mesmerizing videos that brought you to this hobby in the first place. When it comes to battery care, think of it like maintaining a car; regular servicing will prolong the battery’s life and optimize performance.
- Safety First: Poor battery care can lead to overheating, swelling, or even bursting. No one wants to deal with a battery fire!
- Extended Flight Times: By caring for your battery, you can maximize the flight time, allowing for longer filming sessions and more exploration.
- Cost Savings: High-quality batteries don’t come cheap! Proper care can save you from frequent replacements, making your investment worthwhile.
Every time you take your Mavic 2 Pro out for a spin, remember that its battery play a significant role in determining if you return home with that spectacular sunset shot you were hoping for or if you land early—well short of your goal.
Common Battery Issues
Even with the best intentions for battery care, issues can still arise. Understanding these common battery problems can help you stay ahead of any troubleshooting and keep your flights smooth.
- Overheating: It’s not just your drone that gets warm after a long flight—your battery can heat up too! Overheating can cause damage, reduce battery life, and lead to flight interruptions.
- Battery Calibration Issues: It’s important to calibrate your battery correctly. An uncalibrated battery may give you inaccurate readings, leading you to believe there’s more power left than there actually is.
- Self-Discharge and Storage Problems: If left idle for long periods, batteries can self-discharge, which can lead to performance degradation.
- Physical Damage: Dropping your battery or exposing it to extreme weather conditions can affect performance. Always inspect for dents, cracks, or swelling before your flight.
Here’s a nifty little checklist you can use to ensure proactive battery management:
| Common Battery Issues | Signs/Symptoms | Prevention/Tips |
|---|---|---|
| Overheating | Excessively warm to touch | Avoid direct sunlight, fly in moderate temps |
| Inaccurate Battery Levels | Unexpected low battery warnings | Regularly calibrate your battery |
| Self-Discharge | Long idle periods without recharge | Store batteries with 40-60% charge |
| Physical Damage | Visible cracks or swelling | Always inspect before use |
You may have already encountered one of these issues, and if so, you know how they can impact your flying experience. I remember once taking my drone out for a sunset shoot, only to find out my battery was reading full but drained quickly during takeoff. It was a frustrating moment, especially when that golden hour was slipping away! By being diligent in checking and maintaining your batteries, you can enjoy your flights with peace of mind. Next, let’s dive into how you can better understand your Mavic 2 Pro batteries to keep those issues at bay! Understanding the specifications and adhering to the right charging guidelines will make a world of difference. Stay tuned because your journey to battery mastery is just beginning! 🙌

Understanding DJI Mavic 2 Pro Batteries
After discussing the importance of battery care and troubleshooting common issues, it’s time to delve deeper into the intricacies of your DJI Mavic 2 Pro batteries. Understanding the specifications and charging guidelines will not only improve your knowledge but also empower you to take better care of your prized drone battery.
Battery Specifications
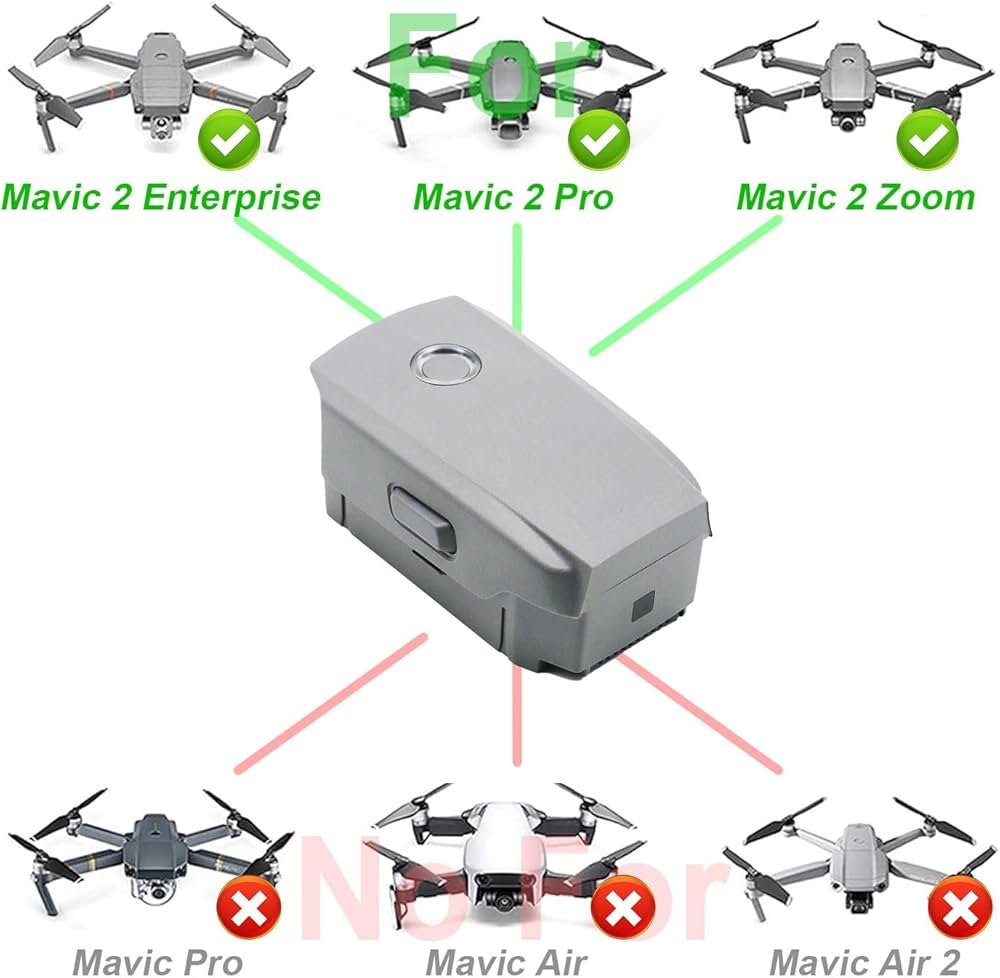
Your Mavic 2 Pro operates on a lithium-polymer (LiPo) battery, specifically designed to maximize performance while keeping weight manageable. Let’s break down some critical specifications that you should keep in mind:
- Battery Type: Lithium-Polymer (LiPo)
- Capacity: 3830 mAh
- Voltage: 11.55V
- Energy: 44.4 Wh
- Weight: Approximately 240 grams (without any added accessories)
These specifications indicate that the Mavic 2 Pro battery is robust yet lightweight, providing an optimal power-to-weight ratio. With a capacity of 3830 mAh, you can typically expect around 31 minutes of flight time under ideal conditions. However, actual flight times can vary due to several factors including wind conditions, temperature, and payload. The drone’s performance can be quickly affected by poor battery health, which is why it’s crucial to maintain your battery diligently. To illustrate the impact of varying conditions, let’s look at this quick reference table of factors that can affect battery performance:
| Factor | Impact on Flight Time |
|---|---|
| Temperature (below 0°C) | Reduced capacity, shorter flight times |
| Wind Conditions | Increased power usage, causes quicker drain |
| Payload | Additional weight means higher consumption |
| Aggressive Maneuvers | Increases power draw significantly |
I remember one foggy morning, excitedly launching my Mavic 2 Pro only to find that the cold air had severely reduced my flight time. What I thought would be a long filming session turned into a quick 20-minute exploration. Now, I always check the weather conditions before going out!
Battery Charging Guidelines
Now that you’re more informed about the specifications, let’s discuss how to charge your Mavic 2 Pro battery correctly. Proper charging can significantly influence the battery’s longevity and performance.
- Use the Official Charger: Always use the DJI-approved charger to ensure safe and efficient charging. Generic chargers can provide inconsistent voltage and current, leading to problems.
- Charging Environment: Charge your batteries in a cool, dry place. Avoid charging in direct sunlight or damp conditions. Optimal charging temperatures are generally between 20°C to 30°C (68°F to 86°F).
- Charging Percentage: It’s best to recharge your Mavic 2 Pro battery when it reaches around 30% to 40% capacity. If you consistently discharge to below this range, it can degrade the battery’s health over time.
- Do Not Overcharge: Overcharging can lead to overheating and significantly reduce battery lifespan. Ensure to remove the battery from the charger once it reaches full capacity—your Mavic 2 Pro battery will typically show a solid green light when fully charged.
- Storage Charge: If you plan to store your batteries for an extended period, it’s advisable to store them at around 40% to 60% battery level. This range helps in preserving battery health.
To make things even easier, here’s a summary for your charging routine:
| Charging Tip | Best Practices |
|---|---|
| Use Official Charger | Always ensure safety and efficiency |
| Optimal Environment | Charge in a cool, dry place |
| Recharge Range | 30% to 40% capacity |
| Avoid Overcharging | Unplug when fully charged |
| Storage Charge | Keep at 40% to 60% for extended periods |
By following these guidelines, you can enhance the lifespan of your drone battery, ensuring you have the power when you need it most. Each flight is an opportunity to capture stunning moments, and ensuring your battery is in tip-top shape gives you the freedom to fly without worry. Reflecting back on my early days, I remember charging my batteries on the kitchen counter, not aware of how temperature could affect my drone’s performance. I once had a day where my battery heat warning kept flashing, ruining what could have been an iconic aerial capture. Learning to thrive in the drone world means being in sync with every component’s needs—even those beneath the surface. So, as you embark on your next flying adventure, remind yourself that a little consideration for your Mavic 2 Pro battery’s specifications and charging guidelines goes a long way in helping you soar higher and longer! 🌟 Next up, let’s explore how you can extend the lifespan of your Mavic 2 Pro battery to keep inching closer to that ultimate aerial perfection! 🚀

Extending Battery Lifespan
Having discussed the essential aspects of battery specifications and charging guidelines for your DJI Mavic 2 Pro, let’s shift our focus to how you can extend the lifespan of these vital components. With proper storage tips and maintenance practices, you can ensure that your batteries remain healthy and perform at their best for many flights to come.
Storage Tips
Proper storage is one of the most critical components in prolonging battery life. Just as you wouldn’t leave your favorite tech gadgets in extreme conditions, your Mavic 2 Pro batteries require thoughtful storage practices. Here are a few guidelines:
- Optimal Charge Level: As previously mentioned, aim to store your batteries at a charge level of around 40% to 60%. Batteries at this range are less likely to undergo stress and degradation.
- Temperature Control: Store your batteries in a cool, dry environment. Ideally, temperatures should range from 20°C to 25°C (68°F to 77°F). Avoid storing batteries in places that experience extreme temperatures, such as attics or basements, which can be hot in summer or cold in winter.
- Use a Battery Storage Bag: Consider investing in a LiPo battery storage bag or case. These specially designed bags not only provide protection against accidental short-circuits but also offer an extra layer of flame resistance. It’s a simple investment that adds safety to your storage.
- Regular Checks: If you don’t use your batteries frequently, schedule a check-up every few months. Ensure to cycle the charge to the optimal range, maintaining a balance between discharging and recharging. This practice helps keep the battery’s internal cells balanced.
- Avoid Moisture: Store your batteries in a moisture-free zone. High humidity can lead to swelling or corrosion. For added protection, consider using silica gel packs in your storage container to absorb any excess moisture.
To illustrate the importance of these practices, reflect on a time when you might have left your battery in your car during a hot day. The battery could heat up excessively, potentially leading to deterioration. Keeping your batteries away from environments where they can be overheated, left out in the elements, or exposed to dampness will go a long way in prolonging their life.
Maintenance Practices
Alongside proper storage, regular maintenance can significantly enhance battery performance and extending its lifespan. Here are some best practices you should adopt:
- Regular Inspections: Before and after flights, inspect your batteries for any signs of physical damage like swelling, cracks, or dents. If you notice any of these issues, it’s best to stop using that battery immediately, as it could pose risks.
- Calibrate Your Batteries: Just as we discussed earlier, battery calibration should be performed periodically. Calibrating ensures accurate percentage readings and helps avoid unexpected drops in power during flight.
- Battery Cycling: Occasionally perform a battery cycle, which involves discharging the battery to around 20% and then charging it back to full. Battery cycling helps balance the cells within the battery, promoting longevity.
- Avoid Deep Discharging: Consistently letting your batteries discharge below 20% can severely impact their lifespan. It’s best to avoid using the batteries until they reach this level, and instead recharge when they hit around 30-40%.
- Follow the Charging Guidelines: Stick to the previously shared charging guidelines. Consistently overshooting charge times or not adhering to recommended charge levels can lead to health complications.
- Firmware Updates: Always keep your drone and batteries updated with the latest firmware from DJI. Updates often come with performance options, battery health insights, and new features that keep everything running optimally.
Here’s a handy summary table of these maintenance practices:
| Maintenance Practice | Details |
|---|---|
| Regular Inspections | Look for damage before and after flights |
| Calibrate Your Batteries | Ensure accurate readings periodically |
| Battery Cycling | Discharge to 20% and recharge fully |
| Avoid Deep Discharging | Recharge when hitting 30%-40% |
| Follow Charging Guidelines | Adhere to recommended charging practices |
| Firmware Updates | Keep firmware current for optimal performance |
As someone who has experienced the consequences of neglecting battery care, I can firmly testify that these practices can save you a frustrating trip home. I once took a battery out on a shooting trip, thinking I would get away with it without a thorough check. By the time I was halfway through my session, I noticed the battery was not performing as expected—what a headache! In addition to ensuring your batteries are safely stored, adhering to a regular maintenance routine will give you confidence in their performance, allowing you to focus on capturing those stunning aerial shots. Maintaining the health of your Mavic 2 Pro battery may require a bit of your time and effort, but the rewards are worth it. By committing to these storage tips and maintenance practices, you can keep your batteries in top shape, ready for your next flying adventure. Next, we’ll delve into how to optimize flight performance to get the most out of your charged batteries, so stay tuned! 🚁✨
Optimizing Flight Performance
With well-cared batteries and an understanding of how to store and maintain them, you’re now ready to take to the skies! However, even the best batteries need some extra attention before and during your flight to ensure optimal performance. Let’s dive into how pre-flight battery checks and effective in-flight battery management can enhance your Mavic 2 Pro’s performance.
Pre-flight Battery Checks
Before you even think about launching your drone, it’s crucial to take a moment and conduct pre-flight battery checks. These checks can help you avoid unexpected issues and make the most of your flying time.
- Physical Inspection: Always inspect your battery for signs of damage such as swelling, dents, or corrosion. A compromised battery can lead to catastrophic failures mid-flight. If you notice anything unusual, set that battery aside until you’ve figured out the issue. It’s always better to be safe than sorry!
- Charge Level Verification: Check the battery’s charge level before leaving home. You can use the DJI Go app or the battery itself to check this. Make sure it’s within the optimal range (30% to 100%) for your intended flight.
- Battery Status via App: Utilize the DJI Go app to verify your battery’s health. The app provides crucial information including the number of charge cycles it has undergone and the battery’s current health status. If the app indicates decreased performance, you might want to consider keeping that battery grounded for the day.
- Calibration Check: If it’s been a while since you last flew your drone, it’s worth checking the calibration of your batteries. Calibration ensures that you’re getting accurate readings about how much charge is left, which helps to prevent premature landing and unexpected power loss during flight.
- Environmental Conditions: Consider the weather and environmental conditions. Extreme temperatures or windy weather can affect battery performance. If it’s particularly warm, your batteries might not hold the same charge, and similarly, cold weather can lead to reduced capacity.
While preparing for a flight last autumn, I recall an incident when a gusty wind advisory prompted me to check my battery levels. I realized one battery was down to 40%—too low for the long-range effects I was hoping for. I quickly grabbed a fully charged one instead, made it safe and sound back home to edit my footage. Having that foresight changed an uncertain trip into a successful shoot! Here’s a quick checklist to help with your pre-flight battery checks:
| Pre-flight Battery Check | Action |
|---|---|
| Physical Inspection | Look for swelling, dents, or damage |
| Charge Level Verification | Ensure battery is adequately charged |
| App Status Review | Check health and cycles in DJI Go app |
| Calibration Check | Calibrate if it’s been a while |
| Weather Conditions | Assess environmental factors before flight |
In-flight Battery Management
Once you’re airborne, effective battery management becomes essential. Making smart decisions during your flight will maximize battery longevity, allowing you to capture impactful shots without worry.
- Monitor Battery Levels: Constantly keep an eye on your battery levels using the DJI Go app. As a rule of thumb, aim to land your drone when it reaches 30% battery. Knowing when to land is vital, especially when airborne for an extended period.
- Smooth Maneuvering: Avoid sudden sharp turns and aggressive maneuvers that can drain your battery faster. Flying gently and steadily will help conserve power for longer flights. I’ve found that taking it easy helps not only with battery life, but also keeps all the shots beautifully steady.
- Flight Modes: Be mindful of the flight mode you’re using. For instance, sports mode consumes more battery due to its aggressive performance settings. If you’re capturing scenic footage, opt for a more stable and slower mode to stretch battery life.
- Altitude Management: Maintain a reasonable altitude while flying. The higher the drone, the more power it takes to keep it airborne, especially if you’re going against the wind.
- Use GPS Wisely: When flying in areas where GPS connectivity may be poor, your drone can use more power trying to stabilize itself. Be mindful of your surroundings and keep your flying area within strong GPS signals.
To help visualize in-flight best practices, consider this simple table:
| In-flight Battery Management | Action |
|---|---|
| Monitor Levels | Track battery levels via the DJI Go app |
| Smooth Maneuvering | Fly gently to conserve energy |
| Utilize Flight Modes | Choose modes wisely depending on needs |
| Manage Altitude | Fly at reasonable elevations to save power |
| Utilize GPS | Keep to areas with strong GPS connectivity |
During one of my drone adventures, I found myself flying in an area where the GPS signal fluctuated. My battery rapidly drained while the drone struggled to maintain stability. Now, I always check my GPS before takeoff. I’ve learned my lesson the hard way! You now have the tools to not just take off but to truly soar with confidence! By performing thorough pre-flight checks and managing your battery wisely during flight, you can significantly increase your Mavic 2 Pro’s battery longevity, making it more reliable for those magnificent drone shots. Next, we will cover troubleshooting any potential battery problems that may arise, ensuring you’re ready for anything the sky throws at you! 🛫✨

Troubleshooting Battery Problems
As much as we wish for flawless drone flights, every pilot at some point may encounter battery-related issues. Fear not! Understanding how to troubleshoot these problems can help you quickly get back in the air. In this section, we’ll cover overheating issues—one of the most common battery problems—and the error messages you might encounter, along with solutions for each.
Overheating Issues
Overheating can be a frustrating issue that not only affects flight performance but can also damage your battery in the long run. Here’s how to identify and manage overheating situations effectively.
- Signs of Overheating: Be mindful of your battery’s temperature. If it feels excessively hot to the touch, that’s a red flag! The DJI Go app will also usually issue warnings if the temperature exceeds safe limits.
- Causes of Overheating:
- High Ambient Temperatures: Flying in extreme heat can cause the battery to heat up faster.
- Overworking the Battery: Aggressive flying and high payloads can lead to increased battery stress.
- Insufficient Cooling: If the battery is packed tightly or enclosed where ventilation is poor, the heat can’t escape.
- Immediate Solutions:
- Land Immediately: If you notice any signs of overheating mid-flight, it’s best to land the drone as quickly as it is safe to do so. Continuing to fly can exacerbate the issue and even cause damage.
- Cool Down Period: Once on the ground, allow the battery to cool down by letting it sit in a well-ventilated area away from direct sunlight. This cooling off period can help preserve battery lifespan.
- Check Settings and Usage: Evaluate how you’re flying. Consider switching to a more stable mode, like “Cinematic,” which is less aggressive, conserving battery energy and preventing overheating.
In one of my experiences flying on a warm summer’s day, I noticed the DJI Go app flashing a warning about battery temperature. Immediately, I landed the drone and discovered that the battery was indeed very warm. After allowing it to cool, I realized that my filming style was too aggressive for the weather that day. I learned to adapt my flying techniques to the environment, leading to better performance on future flights. Here’s a quick checklist of what to do if you face an overheating battery:
| Overheating Troubleshooting | Action |
|---|---|
| Monitor Temperature | Feel the battery; check app warnings |
| Land Immediately | Prioritize safety; land as soon as possible |
| Allow Cooling | Let the battery cool in ventilated areas |
| Adjust Flight Styles | Switch to less aggressive flying modes |
| Evaluate Environmental Factors | Avoid flying in extreme heat |
Error Messages and Solutions
Encountering error messages while operating your DJI Mavic 2 Pro might seem daunting at first. However, knowing how to interpret and resolve these messages can save you time and frustration. Below are some common error messages along with potential solutions.
- Battery Error (Battery Malfunction): This warning generally indicates that there is something wrong with the battery’s health.
- Solution: First, remove the battery and inspect it for physical damage as previously discussed. If all looks well, try recalibrating the battery within the DJI Go app or replacing it if issues persist.
- Low Battery Voltage: This message arises when the battery voltage is too low to fly safely.
- Solution: If you see this warning, it’s time to land immediately. Even if you thought you had enough juice for another flight, the battery is letting you know it’s time to recharge. Also, check with the DJI Go app to see the battery percentage to manage future flights.
- Temperature Warning: This indicates that the battery is too hot or too cold for safe operation.
- Solution: If you encounter this message, land the drone as soon as it is safe to do so, and allow the battery to reach a suitable temperature.
- Calibration Error: If the app indicates a calibration error, it can lead to inaccurate battery readings and sudden landings.
- Solution: Recalibrate the battery using the DJI Go app instructions. Perform this calibration in an environment away from distractions. If the error continues after two or three attempts, it may be time to consult DJI support for possible replacement.
Here’s a summary table for quick reference:
| Error Message | Possible Solution |
|---|---|
| Battery Malfunction | Inspect for damage, recalibrate, or replace |
| Low Battery Voltage | Immediate landing; recharge battery |
| Temperature Warning | Land safely; allow battery to reach optimal temp |
| Calibration Error | Recalibrate; consult DJI support if persistent |
Just recently, I received a temperature warning during a flight. Instead of trying to push through, I chose to land and check my battery. It turned out that not only was I flying aggressively, but also the temperature was rising fast. Taking those steps saved me from what could have been a larger issue. Being prepared to troubleshoot battery problems will help you maintain a smooth flying experience. Remember, the key is to listen to your drone; it often knows exactly what it needs and when. With these troubleshooting techniques in your toolbox, you’re now armed to handle overheating situations and error messages like a pro! In your journey as a drone pilot, knowing how to navigate these challenges will only enhance your passion for capturing breathtaking aerial footage. So, keep exploring and flying safely! 🌤️✈️