Introduction
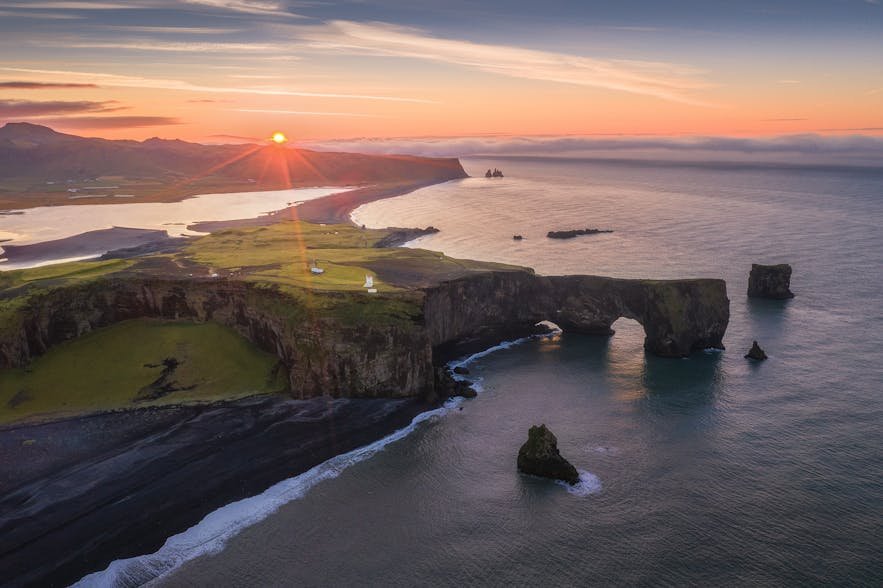
When it comes to capturing the beauty of New Zealand’s landscapes, drones have become essential tools for both seasoned photographers and everyday adventurers. With their ability to showcase stunning aerial perspectives, drones enable you to transform even the most ordinary scenes into breathtaking visuals. As a drone enthusiast myself, I’ve had unforgettable experiences soaring above iconic locations, capturing moments that simply could not be achieved from the ground. In this blog, we’ll explore the ins and outs of drone flying in Aotearoa, covering everything you need to know to enhance your aerial photography and ensure a safe, enjoyable experience. Drones have opened up a world of possibilities for nature lovers and creators alike. But before you take to the skies, being equipped with the right knowledge about regulations, locations, and gear is crucial. So, whether you’re a newbie eager to learn or a pro looking to refine your skills, let’s dive into what New Zealand has to offer!
Drone Regulations in New Zealand
It’s essential to familiarize yourself with drone regulations before launching your craft into the sky. New Zealand boasts a well-structured set of rules that aim to ensure safety, privacy, and respect for the beautiful landscapes you wish to capture. Here are some key regulations to keep in mind:
- Fly below 120 meters (400 feet): This height not only keeps you safe from manned aircraft but also allows you to capture stunning footage.
- Keep your drone within sight: Always maintain visual line-of-sight; this ensures you can react to any potential hazards.
- No flying over people or moving vehicles: Protecting the safety of others is a top priority.
- Respect privacy: Avoid capturing footage of individuals without their consent. This helps build and maintain respect within communities.
- No flying in restricted zones: Certain areas such as airports or emergency services must be avoided.
Understanding and adhering to these regulations not only enhances safety but also fosters positive relationships with local communities and authorities.
Must-Visit Drone-Friendly Locations
With clear skies and breathtaking landscapes, New Zealand is a drone pilot’s paradise. Below are some top drone-friendly locations that I personally recommend exploring. These spots will provide the ideal backdrop for your aerial photography adventures.
North Island
- Waitomo Caves: Fly your drone above the stunning green hills and winding rivers. The caves themselves are awe-inspiring and can be visually contrasted with lush landscapes.
- Tongariro National Park: The dramatic volcanic landscapes will leave you speechless as your drone glides above Mount Ngauruhoe and the stunning Emerald Lakes.
- Whangarei Heads: Capture beautiful coastal views and pristine beaches while flying over this picturesque region.
South Island
- Milford Sound: Often referred to as the ‘eighth wonder of the world’, it’s a dream location for drone photography with its stunning fjords.
- Mount Cook National Park: Towering peaks, alpine lakes, and vast glaciers create a pristine aerial landscape that is perfect for showcasing the wonders of nature.
- Queenstown: Known for its adventure sports, flying your drone above Lake Wakatipu during sunrise or sunset offers stunning colors and reflections.
Tips for Safe and Responsible Drone Flying
Flying your drone isn’t just about having fun; it’s also a responsibility. Here are some valuable tips to help ensure you fly safely:
- Plan your flight: Scout your location beforehand, and ensure you have a clear understanding of the area to avoid hazards.
- Check weather conditions: Wind and rain can impact drone stability, so always check the forecast before heading out.
- Stay charged: Make sure your drone and controller batteries are fully charged. Consider carrying extra batteries for extended flights.
- Practice: If you’re new to drone flying, consider practicing in an open, less crowded area.
Capturing Breathtaking Aerial Shots
Once you’re ready to take flight, focusing on composition can significantly enhance your aerial imagery. Here are some tips to consider while capturing breathtaking aerial shots:
- Use the right settings: Adjust your ISO, shutter speed, and aperture to suit the lighting conditions.
- Rule of thirds: Frame your subject using the rule of thirds to create a well-balanced shot.
- Vary your perspectives: Experiment with different altitudes and angles for diverse visuals.
- Time your flights: The golden hour—just after sunrise or before sunset—offers gorgeous light and shadows.
Drone Photography and Videography Gear Recommendations
Having the right gear enhances your drone flying experience. Here are some essentials for capturing stunning visuals:
- High-Quality Drone: Look for models known for their stability, camera quality, and flight time—such as the DJI Mavic Air 2 or the DJI Mini 2.
- Extra Batteries: More batteries mean longer flights and increased opportunities for amazing shots.
- ND Filters: Neutral density filters are great for minimizing glare and ensuring the right exposure during bright conditions.
- Carrying Case: Protect your drone and accessories with a durable carrying case that can withstand travel.
Conclusion
As you embark on your drone adventures in New Zealand, remember to respect the regulations, focus on safety, and embrace the artistry of aerial photography. With the right preparation and a spirit of adventure, the skies are truly the limit. Happy flying! 🎉

Drone Regulations in New Zealand
As you gear up for your aerial adventures in the stunning landscapes of New Zealand, understanding drone regulations is paramount. Flying your drone legally and responsibly not only helps you avoid fines and penalties, but it also ensures the safety of others and protects the integrity of the beautiful environment you’re capturing. From personal experience, I can tell you that adhering to these regulations allows you to focus on creativity without the looming worry of breaking the law. In New Zealand, the Civil Aviation Authority (CAA) oversees drone usage and has established some key guidelines that every drone pilot must follow. Let’s take a closer look at these regulations to ensure you have a hassle-free flying experience.
Understanding the CAA Rules
The CAA outlines specific rules for different types of drone operations, whether you’re a recreational flyer or using your drone for commercial purposes. Here are some fundamental regulations that everyone should be aware of:
- Height Restrictions: Drones must be flown below 120 meters (400 feet). This limit not only keeps you safe from manned aircraft, but it also enhances the overall safety of the airspace.
- Visual Line of Sight: Always keep your drone within your line of sight. This means you must be able to see it with your own eyes at all times while it’s in the air.
- Avoiding People and Vehicles: You must not fly over people or moving vehicles. This rule is crucial for protecting the public and preventing accidents.
- No Fly Zones: Certain locations are restricted for drone flights, including airports, power plants, and other sensitive areas. Check the local regulations or use apps designed to help you identify these zones.
Here’s a handy table summarizing the essential regulations:
| Regulation | Description |
|---|---|
| Maximum Altitude | Must not exceed 120 meters (400 feet) |
| Visual Line of Sight | Drone must remain within the pilot’s visible range |
| No Flight Over People | Avoid flying over crowds or moving vehicles |
| Restricted Areas | Prohibited in certain zones (airports, emergency services, etc.) |
Additional Considerations
In addition to the basic rules outlined, there are further considerations that can help foster a responsible drone flying culture in New Zealand:
- Respect for Privacy: Before capturing images or footage, think about the individuals around you. Aim to respect their privacy and avoid recording them without permission.
- Wildlife Protection: New Zealand is home to an array of unique wildlife. Avoid flying drones in areas where they may disturb native animals, particularly during nesting or breeding seasons.
- Permits for Commercial Use: If you plan to use your drone for commercial purposes, such as videography or surveying, ensure you obtain the necessary licensing and permits. This process varies depending on your intended operations.
- Insurance Considerations: While not legally required, consider obtaining drone insurance. It can protect you from potential liabilities and damages incurred while flying.
Coping with Local Authorities
While most people appreciate the beauty that drones capture, some may have concerns about privacy and safety. It’s best to engage with local communities respectfully. Here’s how to handle community interactions:
- Inform Locals: If you plan to fly in public spaces, consider informing nearby residents and business owners. This form of communication can help alleviate concerns and build positive relationships.
- Seek Guidance: If you’re unsure about specific locations and their regulations, don’t hesitate to ask local authorities or consult with fellow drone enthusiasts for insight.
Personal Experiences and Anecdotes
I remember my first trip to the stunning landscapes of the South Island. I was excited to capture the majestic peaks and crystal-clear lakes with my drone, but I made sure to brush up on the regulations beforehand. Surprisingly, I found that adhering to the rules significantly enhanced my experience, as I was able to fly with peace of mind. On one occasion, I struck up a conversation with a local park ranger at a popular drone spot. They shared some insights about restricted areas and even showed me some hidden gems for aerial photography. This interaction not only enriched my trip but also reinforced the importance of community relationships.
Joining the Drone Community
Engaging with fellow drone pilots can open up valuable discussions about best practices and safety. Consider joining local drone clubs or forums where you can share tips, experiences, and local regulations. In conclusion, being informed about drone regulations in New Zealand is essential for a smooth flying experience. Embracing these guidelines not only protects you but also respects the breathtaking environment and communities around you. Now that you’re aware of the do’s and don’ts, you’re well on your way to capturing the stunning beauty of New Zealand from above responsibly! 🌏
Must-Visit Drone-Friendly Locations
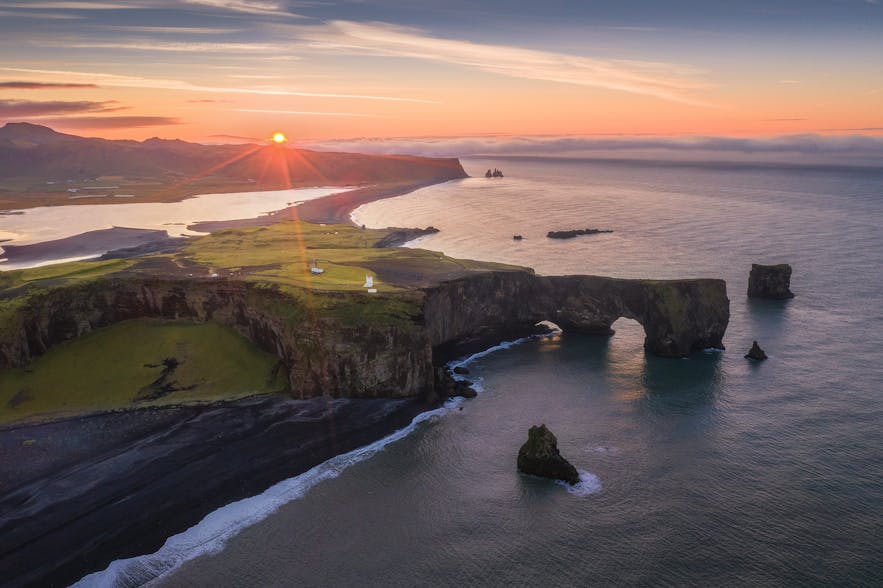
With your understanding of drone regulations in New Zealand, it’s time to plan your flying adventures! New Zealand is brimming with picturesque landscapes, stunning mountains, and vibrant cities that provide amazing opportunities for aerial photography. In this section, I’ll share some of the must-visit drone-friendly locations across both the North and South Islands. Trust me, these spots will take your breath away as they did mine. So, grab your drone and let’s explore!
North Island
The North Island is a treasure trove of diverse environments, from lush forests to stunning coastlines. Here are my top recommendations for drone-friendly locations that will have your camera working overtime.
- Waitomo CavesThe iconic Waitomo Caves are celebrated not just for their stunning underground formations but also for the breathtaking landscapes surrounding them. Flying your drone around the lush green hills and flowing rivers offers a unique perspective. Just be mindful of local wildlife and other visitors in the area.
- Highlights: Vibrant greenery and winding rivers.
- Personal Tip: Visit at sunrise for the best lighting conditions and to experience the morning dew glistening on the leaves.
- Tongariro National ParkA UNESCO World Heritage site, Tongariro National Park boasts active volcanoes, emerald lakes, and diverse ecosystems. The striking contrast between the turquoise lakes and rugged mountains makes for perfect aerial shots.
- Must-Visit Spot: The Emerald Lakes and Mount Ngauruhoe are iconic vistas.
- Personal Experience: I once captured an incredible sunset over the lakes that transformed the sky into a canvas of reds and purples—a shot I still proudly share!
- Whangarei HeadsKnown for its stunning coastal scenery, Whangarei Heads offers several perfect drone-flying spots. The rugged cliffs and shining beaches create spectacular aerial visuals, especially around the castle-like structure of the local landmark, Mount Manaia.
- Why It’s Great: The diverse topography helps create impressive compositions.
- Tip: Consider flying early in the morning for serene waters and fewer distractions.
- Raglan BeachA favorite among surfers, Raglan Beach’s striking natural beauty presents fantastic drone photography opportunities. Capture not only the surfers riding the waves but also the picturesque black sand beaches.
- Highlights: Capture sweeping views of the coastline.
- Personal Anecdote: I’ve watched the sunrise from above the beach, and to see the light hitting the waves was nothing short of magical!
South Island
The South Island is renowned for its dramatic landscapes, offering endless opportunities for drone enthusiasts. Below are some of my top picks that will inspire you to take to the skies.
- Milford SoundMilford Sound is often dubbed the “ninth wonder of the world.” The majestic fjords, towering cliffs, and cascading waterfalls provide an unparalleled backdrop for drone photography. Your aerial shots can truly capture the essence of nature’s grandeur here.
- Best Time to Fly: Early morning or late afternoon when the mist rolls in.
- My Experience: The first time I visited, I was awestruck by the reflections of steep cliffs in the calm waters. It was an experience I’ll never forget!
- Mount Cook National ParkHome to New Zealand’s highest peak, Mount Cook National Park boasts breathtaking vistas of snow-capped mountains, glaciers, and turquoise alpine lakes. Every flight here offers the chance to experience the dramatic landscape from a unique perspective.
- What to Fly Over: Hooker Lake and the surrounding mountain ranges.
- Personal Tip: Aim for a sunrise flight; the sunrise against a snowy backdrop creates a visual masterpiece.
- QueenstownKnown for its adventure sports, Queenstown is a perfect place to explore with your drone. The stunning Lake Wakatipu, surrounded by the dramatic Remarkables range, makes for incredible photography.
- Top Shot Idea: Capture the juxtaposition of vibrant turquoise waters against the jagged mountains.
- My Anecdote: I once recorded a time-lapse of the clouds rolling over the mountains, which turned into a stunning and dynamic shot!
- Franz Josef GlacierThe Franz Josef Glacier and its surrounding rainforest offer a picturesque contrast. The colors and textures of the glacier provide unique opportunities for creative aerial shots.
- Best Time to Capture: Fly during late afternoon when the sunlight highlights the glacier.
- Experience Sharing: I once discovered hidden waterfalls in the rainforest by taking a higher perspective and it became one of my favorite surprises.
Conclusion
New Zealand offers an incredible playground for drone enthusiasts, each location steeped in natural beauty and adventure. By selecting the right spots on both the North and South Islands, you can capture stunning aerial shots and create lasting memories. Always remember to respect local regulations while flying, allowing you to enjoy these breathtaking sights responsibly. Now that your flying locations are sorted, all that’s left is to charge your batteries and let your creativity soar! 🚁✨
Tips for Safe and Responsible Drone Flying
Now that you’ve discovered some breathtaking drone-friendly locations throughout New Zealand, it’s vital to discuss how to fly your drone safely and responsibly. Being in the moment and enjoying the beauty around you is exciting, but keeping safety and regulations in mind ensures that you can share those moments without any worries. So, whether you’re a seasoned pilot or a novice just starting out, here are some essential tips to help you navigate the skies responsibly.
Know Your Regulations
Before you even think about launching your drone, familiarize yourself with local regulations that govern drone operations. Make it a habit to check specific laws for the areas in which you plan to fly. In New Zealand, the Civil Aviation Authority (CAA) has outlined the following key points:
- Fly Below 120 Meters: This is crucial for avoiding manned aircraft, allowing for a safer airspace.
- Maintain Visual Line of Sight: Always keep your drone in your line of sight so you can react promptly.
- Avoid Restricted Areas: Check designated no-fly zones, including airports and densely populated areas, to prevent legal issues.
Picture this: my friend was excited to capture some stunning shots at a popular beach. Unfortunately, he didn’t check the local regulations first and found himself having a chat with local authorities for flying too close to a designated restriction zone. While the conversation was friendly, it was a wake-up call for him to be more diligent.
Pre-Flight Check
Before taking flight, perform a thorough pre-flight check. This ensures your drone functions correctly and safely. Here’s a quick checklist for your pre-flight routine:
| Task | Description |
|---|---|
| Inspect the Drone | Check for any visible damage and ensure all parts are intact. |
| Battery Level | Make sure your battery is fully charged and take spares if possible. |
| Firmware Updates | Ensure your drone’s firmware is up to date for optimal performance. |
| GPS Signal | Verify that you have a good GPS signal before takeoff. |
| Location Awareness | Check nearby airspace usage and any potential hazards or obstacles. |
I learned this the hard way once during an outdoor trip when I skipped the pre-flight check and had an unstable drone mid-air. Thankfully, it was only a few minor adjustments, but it was a lesson learned about the importance of preparation.
Keep Your Distance
As a responsible drone pilot, maintaining a safe distance from other people, properties, and vehicles is crucial. Here’s how to ensure you’re flying without endangering others:
- Stay Clear of Crowds: Avoid flying over large groups of people or events to minimize risks.
- Respect Privacy: Always consider the privacy of those around you. If you see someone in close proximity, it’s best to hold your flight until they’re out of range.
- Maintain Buffer Zones: Keep a distance from buildings, power lines, and other structures to prevent collisions or disturbances.
Remember a time I was flying over a scenic viewpoint when several hikers approached. Instead of continuing my flight, I patiently waited until they had moved away, allowing them to enjoy the view without my drone’s interference.
Understand Weather Conditions
Weather plays a significant role in drone flying, and it’s essential to be aware of the conditions before your flight. High winds, rain, or low visibility can significantly impact your drone’s performance.
- Check the Weather Forecast: Use apps to get reliable forecasts. Avoid flying in severe weather.
- Wind Limitations: Know your drone’s wind resistance. If the winds exceed your drone’s rating, it’s best to stay grounded.
- Lightning Awareness: Never fly during thunderstorms. Lightning poses a threat not just to your drone but to your safety.
One sunny afternoon, I was eager to capture some footage of a waterfall when I noticed the wind was picking up. I made the wise choice to postpone my flight until the winds calmed—that small decision made a world of difference in keeping my footage smooth.
Always Have a Plan
While spontaneity is part of the adventure, having a plan for your flight can ensure that your experience is efficient and enjoyable:
- Flight Path: Outline your intended flight path and make adjustments as necessary while in the air.
- Create a Time Limit: Set a timeframe for your flight, not only for battery management purposes but to prevent any fatigue or rush.
- Emergency Protocol: Prepare for emergencies by knowing how to quickly and safely land your drone or return it to home if things go awry.
During a scenic flight in Fiordland National Park, I lost track of time and was shocked when my battery level dropped low. I quickly followed my plan, directing the drone back home safely, but I knew better for future flights.
Conclusion
Flying a drone can be one of the most rewarding experiences—capturing moments from perspectives like never before! However, safety and responsibility must always come first. By following these tips and remaining informed about regulations, you can enjoy the beauty of New Zealand from above while fostering a culture of respect for others and the environment. So, gear up, plan your flights, and remember to soar responsibly! 🛩️✨

Capturing Breathtaking Aerial Shots
With a solid understanding of drone regulations and a commitment to flying safely, you’re now ready to elevate your photography and videography game! Capturing breathtaking aerial shots is what makes drone flying so exhilarating. However, it takes more than just pressing the record button—there’s artistry involved! I’ve had some incredible experiences while honing my aerial photography skills, and I’m excited to share tips and tricks to help you take stunning shots that leave a lasting impression.
Understanding Composition
Just like traditional photography, composition plays a critical role in drone photography. It’s all about how you frame your subject and the story you want to tell. Let’s delve into some foundational techniques:
- Rule of Thirds: Imagine your frame divided into nine equal parts by two horizontal and two vertical lines. Positioning your subject at one of the intersections often creates a more balanced image.
- Leading Lines: Use natural lines in the landscape, like roads, rivers, or trails, to draw the viewer’s eye toward the main subject. This adds depth to your shots.
- Framing: Look for elements in the landscape—trees, mountains, or buildings—that can act as frames enhancing your composition and guiding the viewer’s focus toward the center.
I began applying these principles during a trip to Lake Tekapo, and the results were incredible! The vibrant turquoise waters, snow-capped mountains, and winding paths came together beautifully.
Timing Your Flights
Lighting can transform an average shot into an extraordinary one. Here’s when to fly for the best conditions:
- Golden Hour: The hour after sunrise and before sunset provides soft, warm light perfect for photography. The colors during this time are often rich and vivid, adding warmth to your images.
- Overcast Days: While many prefer sunny days, overcast conditions can reduce harsh shadows and create a soft, flattering light for shooting scenes with intricate details, especially in forests or rural areas.
- Weather Patterns: Observe how weather affects the light. Dramatic clouds can enhance the mood of your shots and create a captivating atmosphere.
One of my favorite images was captured during sunset at the stunning cliffs near Piha Beach. The sun dipping below the horizon cast an enchanting glow on the rocky formations and surf, which made the colors pop.
Choosing the Right Angles
Drones allow for versatile angles that can dramatically change the perception of the landscape. Experiment with different views:
- High Altitude Shots: Capturing your subject from above can provide context, making the shot stand out.
- Low Altitude Shots: Flying low to the ground can add depth to the landscape and provide unique perspectives, like showcasing texture in the terrain.
- Oblique Angles: Tilting your drone to capture diagonal lines can add dynamism to your images, making them more visually appealing.
During my time flying over the Franz Josef Glacier, I experimented with both high and low angles to create a juxtaposition of grandeur and intricate details, which turned into one of my favorite series.
Post-Processing Tips
Once you’ve captured stunning shots, post-processing can elevate them to new levels. Here are some common techniques to enhance your images:
- Adjustment Layers: Use programs like Adobe Lightroom or Photoshop to adjust brightness, contrast, and saturation. A little push in these areas can make your photos pop!
- Sharpness: Don’t be afraid to apply a bit of sharpening to bring out the details, especially in landscapes where texture is key.
- Color Grading: Experiment with color tones to set the mood of the shot. You could go for warm tones for a cozy feel or cool tones for a more dramatic atmosphere.
I once captured a breathtaking shot of Mount Cook reflecting in the turquoise waters below. Through post-processing, I was able to enhance the colors to emphasize the amazing contrast between the icy peaks and the blue waters, resulting in a photo that truly illustrated the beauty I had witnessed.
Utilizing Drone Features
Modern drones come packed with features that can help you capture stunning footage. Here are a few to consider:
- Follow Me Mode: This feature allows the drone to follow you while keeping you in the frame. It’s great for capturing adventure shots while hiking or cycling.
- Waypoints and Flight Plans: Setting specific waypoints for your drone to follow can ensure you capture a well-planned series of shots, perfect for cinematic sequences.
- Various Shooting Modes: Familiarize yourself with different shooting modes, such as time-lapse or panorama. Each mode can yield diverse outcomes that enhance your photo collection.
Conclusion
Capturing breathtaking aerial shots takes practice and skill, but with the right techniques, anyone can produce stunning visuals. By understanding composition, timing your flights, experimenting with angles, and utilizing post-processing, you’ll be well on your way to creating stunning imagery that captures the essence of New Zealand’s breathtaking beauty. Your drone isn’t just a gadget—it’s a gateway to exploring and sharing the world from new heights. Enjoy every moment and happy flying! 📸🌏✨
Drone Photography and Videography Gear Recommendations
With a solid grasp of how to capture breathtaking aerial shots under your belt, it’s time to talk about the gear that will help you elevate your drone photography and videography experience. A well-equipped setup not only enhances your creative choices but also makes your flying experience smoother and more enjoyable. As someone who’s spent countless hours tinkering with my equipment, I’m excited to share some of my top recommendations for essential gear that will help you make the most of your drone flights.
Best Drones for Photography and Videography
The heart of your aerial photography will be the drone itself. Here are a few tried-and-true options that cater to different skill levels and needs:
- DJI Mavic Air 2
- Resolution: 48MP still photos and 4K video at 60fps
- Battery Life: Up to 34 minutes of flight time
- Weight: Compact, around 570g
- Why I Recommend: Its combination of affordability, portability, and exceptional camera capabilities makes it a fantastic choice for both beginners and experienced pilots. I’ve had numerous successful trips with this drone, capturing stunning landscapes with ease.
- DJI Mini 2
- Resolution: 12MP photos and 4K video at 30fps
- Battery Life: A solid 31 minutes of flight time
- Weight: Ultra-light at just 249g
- Why It Stands Out: This drone is perfect for those looking for a lightweight option without compromising on quality. I love taking it on hikes; it fits perfectly in my backpack!
- DJI Phantom 4 Pro V2.0
- Resolution: 20MP still photos and 4K video at 60fps
- Battery Life: Up to 30 minutes of flight time
- Why It’s Great: This model is favored by professionals for its advanced features, such as obstacle avoidance and a larger sensor. I once used it for a wedding shoot, and the footage was nothing short of cinematic.
| Drone Model | Photo Resolution | Video Resolution | Flight Time |
|---|---|---|---|
| DJI Mavic Air 2 | 48MP | 4K at 60fps | 34 minutes |
| DJI Mini 2 | 12MP | 4K at 30fps | 31 minutes |
| DJI Phantom 4 Pro V2.0 | 20MP | 4K at 60fps | 30 minutes |
Essential Accessories
Alongside your drone, consider investing in some crucial accessories to enhance your photography and videography experience:
- Extra Batteries
- Why You Need Them: Flight times can be limited, and having multiple batteries means more time in the air. I always carry at least two extra batteries for extended sessions.
- ND Filters
- What They Do: Neutral density (ND) filters reduce the amount of light entering the camera, allowing for longer shutter speeds. This helps to create silky-smooth footage in bright conditions. I discovered the magic of ND filters during an afternoon flight over a lake; the results were stunning!
- Carrying Case
- Why It’s Important: A durable, waterproof carrying case protects your drone and gear while traveling. It also makes it easier to transport your setup safely. I invested in a hard-shell case that fits everything perfectly, giving me peace of mind when hitting the trails.
- Drone Landing Pad
- What It Is: This convenient accessory ensures you can take off and land on uneven or sensitive ground without damaging your drone’s propellers or camera.
- My Experience: I used a landing pad in a grassy area once and it made such a difference—I didn’t have to worry about grass or debris interfering with my drone’s sensors!
Software and Editing Tools
After capturing incredible shots, the next step is editing your photos and videos to take them to the next level. Here are some recommendations:
- Adobe Lightroom
- Usage: Perfect for photo editing, Lightroom allows for adjustments in exposure, color correction, and sharpness. It’s my go-to software for enhancing drone shots, giving my images a polished finish.
- Adobe Premiere Pro
- Usage: If you’re working with video, this is a powerful tool for editing. I love its versatility and ability to create professional-quality videos from my drone footage.
- DJI GO 4 App
- Usage: Tailored for DJI drones, this app allows you to manage camera settings, update firmware, and edit basic footage right on your smartphone.
| Software | Purpose | Platform |
|---|---|---|
| Adobe Lightroom | Photo Editing | Windows, Mac, Mobile |
| Adobe Premiere Pro | Video Editing | Windows, Mac |
| DJI GO 4 App | Drone Control | Mobile |
Conclusion
Having the right gear can elevate your drone photography and videography experience significantly. Quality drones like the DJI Mavic Air 2, Mini 2, and Phantom 4 Pro are excellent choices, while accessories such as extra batteries, ND filters, and a reliable carrying case can enhance your experience in the field. Pair this with editing software like Adobe Lightroom and Premiere Pro, and you’ll find yourself well-equipped to create stunning visual stories from your aerial adventures. Remember, every flight is an opportunity to explore and capture the beauty of the world from a fresh perspective. Happy flying, and may your shots always be breathtaking! 🚁📸✨
