
Introduction
Importance of Drone Certification
Drones have transformed myriad industries, from filmography to agriculture, and having a certification is crucial for operating in this exciting realm. Why is it so vital to become a certified drone operator? Picture this: During a breathtaking aerial shoot, you capture spectacular views, but those moments can quickly turn chaotic if you’re not adhering to safety regulations. A drone certification doesn’t just prove your knowledge; it shows that you’re committed to safe and responsible flying. Here are a few key reasons why drone certification is essential:
- Legal Compliance: Operating a drone without certification can lead to hefty fines and legal challenges. By being certified, you abide by the laws set by authorities like the FAA.
- Insurance Benefits: Many insurers require certification to provide coverage for drone operations. Having a certificate gives you peace of mind and financial protection.
- Enhanced Skills: The training that comes with certification teaches you not just the regulations but also enhances your technical flying skills, making you more competent behind the controls.
Think of certification as your ticket to unlocking a world of professional opportunities. As the drone market expands, those with credentials stand out among the competition. You’ll find more clients and have greater access to profitable jobs, which can transform your passion into a sustainable career.
Overview of Becoming a Certified Drone Operator
So, how do you become a certified drone operator? The process can seem daunting, but breaking it down makes it manageable and straightforward! Here’s a step-by-step guide to navigating your way through certification:
- Understand the Requirements: To become certified in the United States, you’ll need to pass the FAA’s Part 107 exam. This exam evaluates your knowledge of U.S. regulations, airspace classifications, weather, and more—a well-rounded understanding of drone operation.
- Prepare for the Exam: There are many resources available; you can find various books, online courses, and even practice exams. I remember studying late into the night, armed with flashcards and countless online quizzes.
- Hands-On Experience: Before taking the exam, it’s beneficial to have some real-world flying experience. Join a local club or find a mentor. I learned so much just by watching other pilots and practicing under their guidance.
- Taking the Part 107 Exam: Once you feel prepared, schedule your exam. It’s administered at approved locations, and the fee for testing is quite manageable.
- Passing the Exam: After successfully completing the exam, you’ll need to register your drone with the FAA and keep it under the necessary weight limit to ensure you comply with regulations.
- Stay Informed: Drone regulations can change, so it’s crucial to stay updated on any new rules or additional training that might be required.
Here’s a quick checklist to help you stay organized:
| Step | Description |
|---|---|
| Understand the Requirements | Study FAA Part 107 regulations |
| Prepare for the Exam | Use study materials and join practice sessions |
| Gain Flight Experience | Fly with a mentor or in a local club |
| Schedule and Take Exam | Register for and take the Part 107 exam |
| Maintain Ongoing Education | Stay up-to-date with rules and regulations |
Every experienced operator has their own journey, and challenges are part of the learning curve. Just remember, every step you take brings you closer to becoming a proficient, certified drone operator! With these insights and preparations, you’re not just aiming for a certificate; you’re on a path to becoming a responsible and skilled professional. Embrace the thrill of flying and the huge potential that comes with it! 🥳

Understanding Drone Regulations
Federal Aviation Administration (FAA) Guidelines
Once you’ve embarked on your journey to becoming a certified drone operator, understanding the regulatory framework becomes your next crucial step. The Federal Aviation Administration (FAA) serves as the primary authority governing drone operations in the U.S., and adhering to their guidelines is non-negotiable. The FAA’s Part 107 regulations are specifically crafted for small unmanned aircraft systems (UAS) weighing less than 55 pounds. Here’s what you need to know:
- Operational Limits: Drones must be flown during daylight hours or in twilight with proper lighting and cannot fly higher than 400 feet above ground level. This ensures safety while keeping operations within visual line of sight (VLOS).
- Pilot Certification: As outlined earlier, obtaining your Part 107 certificate is essential. You’ll need to pass the aeronautical knowledge test, which covers critical topics such as airspace categories, weather, and emergency procedures.
- Pre-Flight Checklist: Before every flight, pilots are required to conduct pre-flight inspections to ensure that the drone is in an airworthy condition. This includes checking for any damage, testing controls, and ensuring battery life is sufficient.
- No Fly Zones: Be vigilant about restricted areas such as airports, military installations, or events with large crowds. The FAA provides maps to help you avoid these locations.
Having experienced these regulations firsthand, I remember my first flight day where I was so excited to capture stunning visuals. But as I reviewed the FAA guidelines, I realized I needed to adjust my flight path to avoid restricted zones near a local airport. It was a learning moment and emphasized the importance of knowing the rules. Being well-versed in FAA guidelines not only helps you operate legally but also ensures you fly responsibly, safeguarding both people and property around you.
State and Local Drone Laws
While the FAA provides a federal backbone of regulations, state and local jurisdictions can set their own laws regarding drone usage, which means it’s crucial to do your homework. Each state may have its own unique requirements that complement federal regulations—sometimes, even contradicting them. Here are some vital points to consider:
- Additional Permits: Some states require specific permits for commercial drone operations or for capturing images in public spaces. Always check your state’s drone law website for updates or unique regulations.
- Privacy Laws: Be aware of privacy issues that may arise when flying drones. Many states have laws that restrict aerial photography in private spaces without consent. I once learned this the hard way when I captured some beautifully serene shots over a park only to find out they fell under a designated privacy zone.
- Local Restrictions: Certain cities may have ordinances prohibiting drone flights in parks, during festivals, or near schools. A quick local government search can save you from potential fines.
Quick Summary of Steps for Compliance:
| Area | Action Required |
|---|---|
| FAA Guidelines | Review and understand Part 107 requirements |
| State Regulations | Research your state’s drone laws |
| Local Ordinances | Check city or county regulations regarding drone use |
| Permission for Buzz | Obtain necessary permissions for flying or filming |
When you combine your knowledge of FAA guidelines with robust understanding of local regulations, you position yourself as an informed operator. This way, you prevent legal issues while gaining respect in your community. Navigating through the complex web of regulations can feel overwhelming at times, but remember, every experienced pilot has been in your shoes. Embrace the learning process, and you’ll emerge as a proficient operator, ready to explore the incredible possibilities of flying. 🌟

Choosing the Right Drone
Types of Drones for Certification
As you gear up to become a certified drone operator, selecting the right drone that meets your needs is essential. Not all drones are created equal, and understanding the various types on the market can help you make an informed choice that aligns with your certification goals.
- Multirotors: These are the most popular type of drones among beginners and professionals alike. They typically have four (quadcopters), six (hexacopters), or eight (octocopters) rotors.
- Pros: Easy to operate, stable, excellent for aerial photography and videography.
- Cons: Generally not designed for long flight times or heavy payloads.
- Fixed-Wing Drones: If you’re looking for endurance, fixed-wing drones might be the answer. They resemble traditional aircraft and are often used for mapping and surveying.
- Pros: Longer flight times, can cover greater distances, efficient in larger operational areas.
- Cons: More complex to fly compared to multirotors, usually require a specific launch and landing area.
- Hybrid Drones: These combine the features of multirotors and fixed-wing aircraft. They can take off and land vertically like a drone and cruise like an airplane.
- Pros: Great versatility for different types of missions.
- Cons: More expensive and requires advanced piloting skills.
- Drones for Specific Use: Some drones are tailored for specialized tasks like agriculture (for crop monitoring) or construction (for site surveying).
- Pros: Optimized features for specific applications (e.g., sensors, payload capacity).
- Cons: May not be versatile for other tasks, can be expensive.
When I first started out, I was drawn to a sleek quadcopter for its ease of use. It served me well for drone photography shoots, but later, I realized I needed a fixed-wing model for my mapping projects. Take the time to explore and consider what type of work you’ll be doing as a drone operator before making a decision!
Factors to Consider When Buying a Drone
Choosing the right drone isn’t just about its type; several critical factors come into play when making your purchase. Here’s a handy list of things to evaluate:
- Budget: Determine how much you’re willing to spend. Basic models can start around $100, while high-end drones can cost thousands. I recommend setting a budget that aligns with your goals.
- Flight Time: Consider how long the drone can operate on a single charge. If you plan to capture extended footage or conduct surveys, a drone with longer flight times (typically 20-40 minutes) will be beneficial.
- Camera Quality: If aerial photography or videography is part of your goals, pay attention to the camera specifications. Look for drones with a stabilized gimbal and at least 4K video capability for crisp performance.
- Range: Understanding how far the drone can be operated from the pilot is essential. Range can vary significantly from model to model, affecting the type of projects you can undertake.
- Ease of Use: If you’re a beginner, opting for user-friendly features like GPS-based navigation and automated flight modes can be a huge advantage.
- Durability: Look for drones constructed with high-quality materials, especially if you plan on flying in various weather conditions. My first drone had a lightweight design that I thought was an asset until I had to replace it after a minor crash!
- Warranty and Support: Make sure to check the warranty offered by the manufacturer and customer support availability. A good warranty can save you money in case of malfunctions.
Here’s a quick table summarizing these key factors:
| Factor | Considerations |
|---|---|
| Budget | Set a range for your purchase |
| Flight Time | Aim for 20-40 mins for extensive tasks |
| Camera Quality | Look for at least 4K with gimbal |
| Range | Assess based on intended use |
| Ease of Use | Look for beginner-friendly features |
| Durability | Prioritize high-quality materials |
| Warranty & Support | Check for coverage and assistance |
With this knowledge in hand, you’re well-prepared to make an informed decision when choosing your drone. A perfect fit not only enhances your flying experience but also boosts your confidence as you take on new challenges in the drone industry! 🚀

Drone Flight Training
Hands-On Flight Practice
As you embark on your drone journey, one vital aspect you can’t overlook is hands-on flight practice. Theory is important, but nothing beats actual flying when it comes to building confidence and skill. This part of your training can determine whether you become a competent operator or find yourself struggling to keep your drone steady in the air.
- Finding the Right Environment: Start by selecting a safe and open space for your practice. Parks, fields, or even empty parking lots can be ideal locations. Avoid busy areas or places with many obstacles to minimize risks. I fondly remember my first practice session; I chose an empty soccer field, and it gave me plenty of room to maneuver (and made for a great backdrop!).
- Basic Maneuvers: Before you jump into complex versions of flying, focus on the basics such as:
- Takeoff and Landing: Getting a good grasp of how your drone lifts off and descends safely.
- Turning: Practice gentle turns to understand your drone’s responsiveness.
- Hovering: Stability while hovering is crucial. Work on maintaining a steady position in the air.
- Simulators: In addition to real-world practice, using drone simulators can be immensely beneficial. Many software options allow you to familiarize yourself with flying without the risk of crashing your drone.
- Gradually Increase Complexity: As you grow more comfortable, challenge yourself by flying in different orientations and learning to perform advanced maneuvers such as flips and rolls. Learning to fly in manual mode can be particularly beneficial, as it forces you to understand your drone’s dynamics more intimately.
- Join a Community: Connecting with fellow drone enthusiasts can provide support, practical tips, and a safe environment to practice. Many clubs host meet-ups and training sessions. I learned so much from my local drone club; pilots of varying skill levels shared insights and techniques that helped me refine my flying.
Understanding Weather Conditions for Safe Flying
As you enhance your flying skills, it’s pivotal to understand how weather conditions can impact your drone operations. Weather can be a significant factor in ensuring safe and successful flights, so let’s dive into what you need to know.
- Wind Conditions: Drones are vulnerable to strong winds. Most consumer drones can handle winds up to around 10-15 mph, but you should refer to your specific drone’s manual for limits. Observe your surroundings—if trees are swaying vigorously, it’s best to postpone your flight. I once attempted to fly on a breezy day, and my drone drifted away from me, ending in an unfortunate crash!
- Temperature: Extreme temperatures can impact battery performance. Cold weather can reduce battery life significantly, while overly hot conditions can lead to overheating. Always check the temperature rating for your drone and plan accordingly, especially if flying in extreme conditions.
- Precipitation: Flying in rain or fog is a no-go for most drones. It’s essential to keep your drone dry—moisture can harm electronics. Make a habit of monitoring weather forecasts before heading out. I learned this the hard way on an overcast day, and I found myself packing up far earlier than planned when the drizzle turned into a downpour.
- Rapid Weather Changes: Be cautious of sudden changes in weather conditions. A clear, sunny day can quickly turn windy and stormy. Always be prepared to land your drone promptly if conditions worsen.
To summarize, creating a robust flight training plan that includes hands-on practice and understanding weather conditions is vital for anyone serious about becoming a skilled drone operator. Whether you’re perfecting your maneuvers or keeping a steady eye on the weather, these practices allow you to fly safely while honing your skills. Your confidence will soar, and soon enough, you’ll be capturing breathtaking aerial visuals safely and effectively! 🌤️✈️

Mastering Aerial Photography and Videography
Camera Settings and Angles
Once you’ve got the hang of flying your drone, the next exciting step is mastering aerial photography and videography. The right camera settings and angles can elevate your content from ordinary to extraordinary. Whether you’re capturing stunning landscapes, dynamic real estate shots, or event coverage, understanding how to leverage your camera’s capabilities is essential.
- Camera Settings: Familiarize yourself with the following settings to enhance your footage:
- Resolution: Set your drone’s camera to the highest resolution possible, usually 4K, to capture sharp and detailed footage. You never know when you might want to crop or zoom in during editing.
- Frame Rate: Adjust your frame rate depending on the type of shot. For a cinematic look, 24 fps is a popular choice, while higher frame rates like 60 fps are great for capturing fast action.
- Shutter Speed: Aim to maintain a shutter speed that is at least double the frame rate. This helps to create that smooth motion blur which provides a more natural, fluid look in your videos. For example, if you’re shooting at 24 fps, set your shutter speed to 1/50th of a second.
- ISO and Exposure: When shooting in bright sunlight, keep your ISO low (100-400) to avoid overexposure. If conditions are dim, increase that ISO cautiously to maintain clarity.
- Choosing Angles: The angle at which you shoot can make a world of difference. Try out these techniques:
- Establishing Shots: Start your sequences with wide shots to give viewers context. A high-angle shot showcasing a beautiful landscape or city skyline can be breathtaking.
- Tracking Shots: Fly your drone parallel to a moving subject (like a car or runner) for dynamic, engaging footage. This method creates a sense of motion.
- Bird’s Eye View: Capture unique perspectives by flying directly above your subject. This angle can create stunning patterns and symmetry in landscapes.
- Creative Angles: Don’t hesitate to experiment with unique angles that others might overlook, such as low-angle shots through trees or close-ups of interesting textures.
I remember my first attempt at capturing aerial footage of a wedding venue. Using a wide shot to establish the venue’s layout allowed me to depict the beauty of the surroundings. The changes in angle really added depth to the final video, and the clients loved it!
Editing and Post-Production Techniques
Once you’ve shot your aerial visuals, the magic of editing comes into play. Post-production is where you can polish your work and make those stunning shots truly shine. Here’s how to approach it:
- Choosing Software: Depending on your level of expertise, there are various editing programs available:
- Beginners: Software like iMovie or Adobe Premiere Rush is user-friendly and perfect for basic edits.
- Advanced Users: For more complex edits, Adobe Premiere Pro and Final Cut Pro offer advanced features that can transform your footage dramatically.
- Basic Editing Steps:
- Organize Your Clips: Sort your footage into folders based on location or event for easy access during editing.
- Cutting and Trimming: Keep your video engaging by eliminating unnecessary footage. Aim for a smooth flow that maintains interest.
- Color Correction: Enhance your visuals by adjusting brightness, contrast, and saturation. Tools like LUTs (Look-Up Tables) can help maintain a consistent look across your video.
- Sound Design: Don’t forget to add music and sound effects that complement your visuals. Always ensure you have the right to use music by sourcing it from royalty-free libraries.
- Adding Effects:
- Transitions: Use transitions sparingly to maintain a professional feel. Simple cuts or fades work well in most scenarios.
- Text and Titles: Include brief titles or captions to provide context, credits, or highlight important information. Make sure they mesh well with your overall aesthetic.
As I edited my first aerial video, I was amazed at how simple tweaks in color and pacing changed the narrative. Those minute details can enhance the storytelling aspect, making viewers feel connected to your content. In summary, mastering aerial photography and videography involves understanding your camera settings, experimenting with angles, and applying effective editing techniques. With practice and creativity, you’re on your way to creating breathtaking content that captivates audiences and showcases the beauty of the world from above! 🎥✨

Drone Maintenance and Safety
Pre-Flight Checklist
As you dive deeper into the exhilarating world of drone flying, embracing a robust maintenance and safety routine is crucial. Nothing facilitates a smooth flight quite like a thorough pre-flight checklist. This routine not only ensures your drone is in prime condition but also helps prevent accidents that could lead to damaging your equipment or worse. Here’s a comprehensive pre-flight checklist to guide you:
- Drone Inspection:
- Physical Damage: Check for cracks, dents, or any visible wear and tear on the drone body, arms, and propellers. I once overlooked a small crack which, unfortunately, affected my drone’s aerodynamics during flight.
- Propellers: Inspect propellers for chips or any irregularities. Always ensure they’re securely attached and free from obstructions.
- Battery Condition: Check battery levels and ensure the battery is securely installed. I learned this the hard way when I almost took off with a partially charged battery!
- Calibration:
- Leveling: Calibrate the drone’s compass and gyroscope to maintain accurate navigation.
- Home Point: Ensure your home point is set correctly, so the drone knows where to return for landings.
- Control Check:
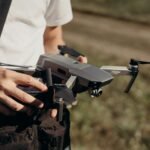
- Remote Controller: Make sure the controller is fully charged and responsive. Test all control sticks for smooth movement.
- Firmware Updates: Check for the latest firmware updates for both the drone and remote controller. Regular updates can fix bugs and enhance performance.
- Environmental Check:
- Weather Conditions: Assess wind speed, precipitation, and visibility. If the conditions look risky, it might be better to delay your flight.
- No-Fly Zones: Use a drone app to confirm that you’re cleared to fly in your chosen area, avoiding restricted locations like airports and sensitive sites.
Here’s a quick reference table to summarize the pre-flight checklist:
| Item | Action Required |
|---|---|
| Drone Inspection | Check for physical damage and secure propellers |
| Battery Condition | Inspect battery levels and connections |
| Calibration | Calibrate compass and gyroscope |
| Control Check | Test remote control functionality and update firmware |
| Environmental Check | Evaluate weather and confirm no-fly zones |
Following this checklist can save you from potential problems mid-flight and ensure that you have a successful and fun drone session!
Troubleshooting Common Issues
Despite our best efforts, sometimes problems arise. Knowing how to troubleshoot common drone issues can make all the difference in getting back to enjoying your flying experience. Here are some frequent issues and solutions:
- Drone Won’t Start:
- Battery Issues: Ensure that the battery is fully charged and properly connected. If the battery is swollen or damaged, it should be replaced.
- Firmware Update Required: A failure to start could be due to outdated firmware. Connecting to the drone’s app or software can help check for updates.
- GPS Signal Lost:
- Calibration: If your drone loses GPS signal mid-flight, try recalibrating the compass and gyroscope.
- Environmental Interference: Ensure that you are away from tall buildings or structures that might block the GPS signal.
- Drone Drifting:
- Trim Adjustment: If your drone drifts when in hover mode, use the trim functions on your remote controller to adjust the drone back to a stable position.
- Calibration Needed: Drift can also indicate the need for calibration. Give the drone a full calibration according to the manufacturer’s instructions.
- Poor Video Quality:
- Lens Cleaning: Always check that the camera lens is clean and free of smudges or debris. A dirty lens can drastically reduce image quality. I’ve seen noticeable improvements in footage clarity with just a quick wipe!
- Settings Review: Go back to your camera settings to ensure you’re shooting at the correct resolution and frame rate.
- Unresponsive Remote Controller:
- Battery Check: Confirm the remote controller battery is fully charged.
- Rebinding: Sometimes, simply rebinding the controller to the drone can resolve connectivity issues.
Staying informed of potential issues not only boosts your confidence as a pilot but allows you to enjoy flying efficiently and safely. Remember, every pilot faces challenges, but with the right preparation and troubleshooting skills, you’ll be soaring through the skies stress-free! By focusing on maintenance and safety, you’re ensuring both the longevity of your equipment and the thrill of a safe, fun flying experience. Happy flying! 🚁✨

Business Opportunities for Certified Drone Operators
Real Estate Photography and Videography
As a certified drone operator, the sky’s the limit—literally! One of the most lucrative areas you can dive into is real estate photography and videography. Real estate professionals are constantly on the lookout for innovative ways to showcase properties. With aerial perspectives, you can help them stand out in a competitive market.
- Capturing Unique Angles: Drones allow you to capture stunning overhead shots of the property. This includes not just the house but also the surrounding landscape, neighborhood, and features that make the property special. Think about how a beautiful pool or manicured garden looks from above—these shots can create a significant impact.
- Virtual Tours: Incorporating drone footage into virtual tours can give potential buyers an immersive experience. Combine ground footage with aerial shots to provide a comprehensive view of the property. I remember working with a local real estate agent whose listings turned around quickly once we included drone footage. It made a world of difference!
- Marketing Packages: Many real estate agents appreciate having different media formats available. By offering packages that include high-resolution photos, videos, and branded content, you can provide significant value. Consider creating packages tailored to various budgets, catering to both luxury listings and more modest homes.
- Networking with Agents: Building solid relationships with real estate agents can lead to repeat business. Attend local real estate events and network to showcase your portfolio. Word of mouth is powerful, especially when an agent can confidently refer you to their clients.
Quick Tips for Success in Real Estate Drone Work:
- Understand the Local Market: Different regions may have varying demands. Familiarize yourself with what types of properties are prevalent and tailor your services accordingly.
- Develop Post-Editing Skills: Enhancing your footage with editing can make your work pop. Learning to use software like Adobe Premiere or Final Cut Pro will set you apart from others.
- Offer Competitive Pricing: Monitor local competitors to ensure your pricing is attractive while still maintaining a profit margin.
Agriculture and Inspection Services
Another promising avenue for certified drone operators is agriculture and inspection services. Drones are revolutionizing the agricultural industry by providing farmers with new tools for monitoring and managing their crops effectively.
- Crop Monitoring: Drones equipped with specialized cameras can assess crop health using NDVI (Normalized Difference Vegetation Index) imaging. This technology helps identify areas of stress, disease, or nutrient deficiency long before they significantly impact yield.
- Surveying Fields: With drones, you can create highly accurate maps of fields, which aids in planning and maximizing productivity. I had the chance to work with a local farm, where my aerial mapping made it much easier for them to plan their irrigation and planting strategies.
- Livestock Monitoring: Drones allow farmers to monitor livestock across large tracts of land. By providing overhead views, farmers can quickly locate animals and assess their health without a labor-intensive on-ground search.
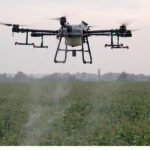
- Crop Spraying: As drone technology evolves, some drones are even capable of carrying and spraying fertilizers or pesticides. This capability can save time and reduce chemical exposure for farmworkers.
- Inspection Services: Beyond agriculture, there’s a booming need for inspection services in sectors like construction, oil, and gas. Drones can safely inspect hard-to-reach places—think rooftops, power lines, pipelines, and wind turbines—without requiring extensive scaffolding or ladders.
Essential Considerations for Agriculture and Inspection Services:
- Data Analysis: Get comfortable with software that can analyze drone data. Skills in mapping software or agricultural analysis programs can enhance the value you provide.
- Stay Informed: The agriculture sector is dynamic, so it’s crucial to stay updated on the latest technology and trends.
- Networking with Farmers: Build relationships with local farmers and agricultural agencies. Attend agricultural expos or seminars to connect with potential clients.
In conclusion, as a certified drone operator, opportunities abound in real estate, agriculture, and inspection services. By honing your skills, understanding the needs of your target market, and staying adaptable, you can carve out a successful niche for yourself. Your unique position allows you to leverage cutting-edge technology for diverse applications—so take the leap and watch your business soar! 🚀🌾📸

Taking the FAA Part 107 Exam
Study Resources
When you’re ready to take the plunge into becoming a certified drone operator, the FAA Part 107 exam is your gateway. The exam can seem intimidating at first, but with the right study resources at your disposal, you’ll be well-prepared to pass with flying colors! Here are some invaluable resources that can help you get started on your studying journey:
- FAA’s Official Study Material: The FAA provides a free “Remote Pilot – Small Unmanned Aircraft Systems Study Guide” that outlines everything you need to know for the exam. This guide is a must-read, covering essential topics like regulations, airspace classifications, and weather.
- Online Courses: Platforms like Udemy and Coursera offer comprehensive courses designed to prepare you for the Part 107 exam. I found an online course particularly helpful where the instructor broke down complex concepts into digestible segments.
- Practice Exams: Websites such as Remote Pilot 101 or Pilot Institute offer practice exams to give you a feel for the actual test format and the types of questions you’ll face. Taking these practice tests can help boost your confidence.
- YouTube Tutorials: Don’t underestimate the value of video tutorials! Many experienced drone pilots have created helpful content that explains tricky concepts and tips for navigating the exam. I found several videos that visually illustrated how to interpret sectional charts, which was immensely helpful.
- Study Groups: Consider joining a study group or forum. Connecting with fellow aspiring drone pilots can provide additional perspectives, resources, and encouragement. Sharing experiences can clarify doubts, and the group dynamic helps keep motivation levels high.
Recommended Resources Summary:
| Resource Type | Examples |
|---|---|
| Official Study Guide | FAA Remote Pilot Study Guide |
| Online Courses | Udemy, Coursera |
| Practice Exams | Remote Pilot 101, Pilot Institute |
| Video Tutorials | YouTube Channels |
| Study Groups | Online forums, social media groups |
By utilizing these resources, you’ll build a solid knowledge base and feel more prepared as the test day approaches.
Tips for Passing the Exam
Once you’ve dedicated time to study, it’s essential to have some strategic tips up your sleeve for the exam day itself. While each person’s experience can differ, here are some tried-and-true tips that can help increase your chances of success:
- Understand the Exam Format: Knowing what to expect can help ease anxiety. The Part 107 exam consists of 60 multiple-choice questions covering various topics. The passing score is 70%, so aim to answer at least 42 questions correctly.
- Time Management: You’ll have 2 hours to complete the exam, which gives you about 2 minutes per question. Focus on the questions you find easier first, which can build your confidence and help you score higher.
- Read Carefully: Many test-takers rush through questions and misinterpret what’s being asked. Take your time to read each question and all answer choices thoroughly before making your selection.
- Use the Process of Elimination: If you’re unsure about an answer, eliminate the choices you know are incorrect. This strategy increases your odds of answering correctly.
- Stay Relaxed and Focused: It’s natural to feel nervous, but try to stay calm. Take a deep breath—if you feel overwhelmed, pause for a moment and refocus before continuing.
- Take Breaks During Study: While preparing for the exam, it’s important not to cram. Take regular breaks between study sessions to keep your mind fresh. When I took breaks, I often came back with a clearer understanding of what I had studied.
- Revisit Weak Areas: Pay extra attention to areas where you feel less confident. Spend the last few days before your exam reviewing key topics like airspace regulations or weather patterns, as these often carry challenging questions.
- Plan for the Day: On the exam day, ensure you arrive early to avoid stress. Bring necessary identification and materials, and don’t hesitate to ask the examiners questions if you’re unsure about anything during the test.
By arming yourself with the right study resources and following these tips, you’ll be well-prepared to tackle the FAA Part 107 exam. Remember, everyone has their own studying style, so find what works best for you, stay focused, and give it your best shot! Your future as a certified drone operator awaits! 🎉✨